- English
- Deutsch
- Polski
- Français
- Home
- Resolución de problemas
- Resolución de problemas
- Puppy error #17514 (XL)
Puppy error #17514 (XL)
- Resolución de problemas de la calidad de impresión
- Resolución de problemas
- Recalentamiento A64 #10207 (SL1/SL1S)
- Comprobación de la temperatura ambiente (MK3 / MK3S)
- Temperatura ambiente demasiado fría #10703 (SL1/SL1S)
- Temperatura ambiente demasiado alta #10702 (SL1/SL1S)
- Ha ocurrido un error inesperado #10701 (SL1)
- No se puede ejecutar esta acción #10506 (SL1/SL1S)
- Fallo Asignación BBF #13531 (MK4) #21531 (MK3.9) #23531 (MK3.5)
- BBF Allocation Failed #17531 (XL)
- Fallo Inicialización BBF #13532 (MK4) #21532 (MK3.9) #23532 (MK3.5)
- Inicialización de BBF fallida #17532 (XL)
- Error maxtemp base #13205 (MK4) #21205 (MK3.9) #23205 (MK3.5)
- Error mintemp base #13207 (MK4) #21207 (MK3.9) #23207 (MK3.5)
- Error precalentamiento base #13201 (MK4) #21201 (MK3.9) #23201 (MK3.5)
- Deriva térmica Base #13203 (MK4) #21203 (MK3.9) #23203 (MK3.5)
- Fusible Fundido (MINI)
- Fusible Fundido (MK2S- MK2.5- MK2.5S)
- Fusible fundido (MK3/MK3S/MK3S+)
- Fusible fundido (MK4)
- Problema en la placa Boost #10320 (SL1S)
- Impresora bloqueada (SL1/SL1S)
- El proyecto de calibración no es válido #10543 (SL1/SL1S)
- No se puede copiar el proyecto #10704 (SL1/SL1S)
- Canal de actualización no disponible #10514 (SL1)
- No se puede leer el proyecto #10539 (SL1/SL1S)
- No se puede eliminar el proyecto #0545 (SL1/SL1S)
- Hotend atascado (MK4)
- Hotend atascado (XL)
- Boquilla/Hotend atascado (MINI/MINI+)
- Boquilla/Hotend atascado (MK3S, MK2.5S)
- Connect Registration Failed
- Connect Registration Failed #12401 (MINI)
- Connect Registration Failed #13401 (MK4)
- Connect Registration Failed #17401 (XL)
- Connect Registration Failed #21401 (MK3.9)
- Connect Registration Failed #23401 (MK3.5)
- Directorio no está vacío #10546 (SL1/SL1S)
- Panel LED UV desconectado #10321 (SL1/SL1S)
- Fallo en la comprobación de la pantalla #10120 (SL1/SL1S)
- Error Dwarf #17502 (XL)
- Error Dwarf #17503 (XL)
- EEPROM I2C Receive Busy #13316 (MK4) #21316 (MK3.9) #23316 (MK3.5)
- EEPROM I2C Receive Busy #17316 (XL)
- Emergency stop #12510 (MINI)
- Parada de emergencia #13510 (MK4) #21510 (MK3.9) #23510 (MK3.5)
- Emergency stop #17510 (XL)
- Error ESP #13504 (MK4) #21504 (MK3.9) #23504 (MK3.5)
- Error ESP #13505 (MK4) #21505 (MK3.9) #23505 (MK3.5)
- Error ESP #13506 (MK4) #21506 (MK3.9) #23506 (MK3.5)
- Error ESP #17504 (XL)
- Error ESP #17505 (XL)
- ESP error #17506 (XL)
- Posible recalentamiento #10714 (SL1/SL1S)
- La memoria Flash externa SPI W25X20CL/xFLASH no responde - error
- Residuos en el extrusor
- Extruder Maxtemp error #17206 (XL)
- Error Mintemp Extrusor #17208 (XL)
- Ruidos en el extrusor
- Error precalentamiento extrusor #17202 (XL)
- Temp extrusor no coincide #17210 (XL)
- Deriva térmica extrusor #17204 (XL)
- La extrusión se detuvo a mitad de la impresión (por recalentamiento)
- Ajustes de Fábrica (MINI)
- Restablecimiento a opciones de fábrica (MK2S/MK2.5S/MK3S)
- Factory reset (MK4/XL)
- Factory Reset (MMU)
- Ajustes de Fábrica (MMU2S pre firmware 1.0.6)
- Ajustes de Fábrica (SL1/SL1S)
- Fallo al leer el archivo de configuración #10505 (SL1)
- Fallo en la calibración Z (MK3S/MK2.5S)
- Fallo ventilador #10106 (SL1/SL1S)
- Advertencia de ventilador #10713 (SL1/SL1S)
- El filamento no se ha descargado (MINI/MINI+)
- El filamento no se carga
- El filamento no carga (MK4)
- El filamento no carga (XL)
- Sensor de filamento (MK4, MK3.9, XL)
- ¡El archivo ya existe! #10520 (SL1)
- Archivo no encontrado #10518 (SL1/SL1S)
- Error del sistema de archivos #12613 (MINI/MINI+)
- Error del sistema de archivos #13613 (MK4) #21613 (MK3.9) #23613 (MK3.5)
- Configuración y resolución de problemas de FINDA
- FINDA: Filamento atascado #04102 (MMU)
- ¡Firmware en la flash interna dañado! #12608 (MINI)
- Firmware missing #17612 (XL)
- Actualización de Firmware Necesaria #13701 (MK4) #21701 (MK3.9) #23701 (MK3.5)
- Problemas de actualización de firmware (MK2.5S/MK3S+/MMU2S/MMU3)
- La primera capa no se pega (SL1/SL1S)
- Error de borrado de flash #12605 (MINI/MINI+)
- Error de borrado de flash #13605 (MK4) #21605 (MK3.9) #23605 (MK3.5)
- Flash erase error #17605 (XL)
- FW en flash interno dañado #13608 (MK4) #21608 (MK3.9) #23608 (MK3.5)
- FW in internal flash corrupted #17608 (XL)
- Fallo en la verificación del hash #12607 (MINI/MINI+)
- Fallo en la verificación del hash #13607 (MK4) #21607 (MK3.9)
- Fallo en la verificación del hash #17607 (XL)
- La base calefactable no se está calentando correctamente
- Sobrecorriente Puerto Base calefactable #13309 (MK4) #21309 (MK3.9) #23309 (MK3.5)
- Error MAXTEMP Heatbreak #13212 (MK4) #21212 (MK3.9)
- Error Maxtemp Heatbreak #17212 (XL)
- Error MINTEMP Heatbreak #13211 (MK4) #21211 (MK3.9)
- Error Mintemp Heatbreak #17211 (XL)
- Error de Homing #12301 (MINI)
- Error Homing X #13304 (MK4) #21304 (MK3.9) #23304 (MK3.5)
- Homing error X #17304 (XL)
- Error de Posicionamiento del Eje Y #13305 (MK4) #21305 (MK3.9) #23305 (MK3.5)
- Homing error Y #17305 (XL)
- Error Homing Z #13301 (MK4) Z #21301 (MK3.9)
- Error Homing Z #17301 (XL)
- Homing Error Z #23301 (MK3.5)
- El ventilador del fusor no está girando
- Hotend maxtemp error #23206 (MK3.5)
- Error mintemp hotend #13208 (MK4) #21208 (MK3.9)
- Hotend mintemp error #23208 (MK3.5)
- Error precalentamiento hotend #13202 (MK4) #21202 (MK3.9)
- Hotend preheat error #23202 (MK3.5)
- Hotend temp not matching #13210 (MK3.9/MK4) #23210 (MK3.5)
- Hotend temp not matching #23210 (MK3.5)
- Deriva térmica Hotend #13204 (MK4) #21204 (MK3.9)
- Hotend thermal runaway #23204 (MK3.5)
- I2C Receive failed #13315 (MK4) #21315 (MK3.9) #23315 (MK3.5)
- I2C Receive failed #17315 (XL)
- I2C Receive Timeout #13317 (MK4) #21317 (MK3.9) #23317 (MK3.5)
- I2C Receive Timeout #17317 (XL)
- I2C Receive undefined #13318 (MK4) #21318 (MK3.9) #23318 (MK3.5)
- I2C Receive undefined #17318 (XL)
- I2C Send Busy #13312 (MK4) #21312 (MK3.9) #23312 (MK3.5)
- I2C Send Busy #17312 (XL)
- I2C Send failed #13311 (MK4) #21311 (MK3.9) #23311 (MK3.5)
- I2C Send failed #17311 (XL)
- I2C Send Timeout #13313 (MK4) #21313 (MK3.9) #23313 (MK3.5)
- I2C Send Timeout #17313 (XL)
- I2C Send Undefined #13314 (MK4) #21314 (MK3.9) #23314 (MK3.5)
- I2C Send Undefined #17314 (XL)
- ¡Impostor! Firma falsa #17606 (XL)
- Modelo de impresora incorrecto #10705 (SL1/SL1S)
- Memoria interna llena #10516 (SL1/SL1S)
- Clave API no válida #10405 (SL1/SL1S)
- Tamaño de FW no válido en USB #12603 (MINI/MINI+)
- Tamaño de FW no válido en USB #13603 (MK4) #21603 (MK3.9) #23603 (MK3.5)
- Invalid FW size on USB flash drive #17603 (XL)
- Calibrado del sensor del filamento IR (MMU2S)
- Resolución de problemas del sensor de filamento IR (MINI/MINI+)
- Resolución de problemas del sensor de filamento IR (MK2.5S, MK3S)
- La pantalla LCD no funciona
- Error de memoria LED #13529 (MK4) #21529 (MK3.9) #23529 (MK3.5)
- Error de Memoria LED #17529 (XL)
- El Ajuste en vivo Z no se guarda
- Load to extruder failed #04108 (MMU)
- Mala Configuración Célula de carga #13527 (MK4) #21527 (MK3.9)
- Mala Configuración Célula de carga #17527 (XL)
- Fallo Medición Célula de carga #13526 (MK4) #21526 (MK3.9)
- Fallo medición célula de carga #17526 (XL)
- Célula de carga No Calibrada #13523 (MK4) #21523 (MK3.9)
- Célula de carga no calibrada #17523 (XL)
- Error Tara Célula de Carga #13524 (MK4) #21524 (MK3.9)
- Error tara célula de carga #17524 (XL)
- Fallo Tara Célula de carga #13525 (MK4) #21525 (MK3.9)
- Fallo tara célula de carga #17525 (XL)
- Timeout Célula de carga #13528 (MK4) #21528 (MK3.9)
- Timeout célula de carga #17528 (XL)
- Registro de datos por línea serial (MMU2S)
- Fuertes ruidos causados por la impresora (SL1/SL1S)
- Prueba del sensor M.I.N.D.A./SuperPINDA (MINI/MINI+)
- Timeout Solicitud Marlin #13530 (MK4)) #21530 (MK3.9) #23530 (MK3.5)
- Timeout Solicitud Marlin #17530 (XL)
- Aviso máscara inservible #10709 (SL1/SL1S)
- Error Maxtemp en la base #12205 (MINI)
- Error Maxtemp en el fusor #12206 (MINI)
- MCU Maxtemp Error #17213 (XL)
- Error mintemp en la base #12207 (MINI)
- Error Mintemp en el fusor #12208 (MINI)
- Sensor PINDA desalineado (MK2/S)
- Faltan piezas (SL1/SL1S)
- La MK3S sigue solicitando el cambio de filamento
- Subtensión MCU MMU #04307 (MMU)
- MMU Overcurrent #13310 (MK4) #21310 (MK3.9) #23310 (MK3.5)
- Tensor MMU2S no puede moverse libremente
- Significado de los LED MMU2S
- El selector MMU2S no se mueve
- Error cama modular #17250 (XL)
- Error cama modular #17251 (XL)
- Error cama modular #17252 (XL)
- Error cama modular #17253 (XL)
- Error cama modular #17254 (XL)
- Error cama modular #17255 (XL)
- Error cama modular #17256 (XL)
- Error cama modular #17257 (XL)
- Modular bed error #17302 (XL)
- Modular bed error #17303 (XL)
- Error Cama Modular #17319 (XL)
- Error Cama Modular #17320 (XL)
- Error cama modular #17501 (XL)
- Uso del multímetro
- No hay archivos en USB #12604 (MINI/MINI+)
- Falta archivo que reimprimir #10508 (SL1)
- No FW en flash interno #12612 (MINI/MINI+)
- No FW en flash interno #13612 (MK4) #21612 (MK3.9)
- No hay FW en USB #13604 (MK4) #21604 (MK3.9) #23604 (MK3.5)
- No FW on USB flash drive #17604 (XL)
- No hay conexión a la red #10402 (SL1/SL1S)
- No hay suficientes capas #10540 (SL1/SL1S)
- No hay suficiente resina #10706 (SL1/SL1S)
- Nozzle Cleaning Failed (MK4, MK3.9)
- Limpieza de la Boquilla Fallida. (XL)
- Boquilla estrellada en la base calefactable
- Sobrecorriente Calentador Boquilla #13308 (MK4) #21308 (MK3.9)
- Nozzle Heater Overcurrent #23308 (MK3.5)
- Advertencia de pieza recortada #10710 (SL1/SL1S)
- No se pudo abrir el proyecto #10504 (SL1/SL1S)
- Sin memoria #13507 (MK4) #21507 (MK3.9) #23507 (MK3.5)
- Sin memoria #17507 (XL)
- Comprobación de la sonda P.I.N.D.A./SuperPINDA
- Parámetros fuera de rango #10707 (SL1/SL1S)
- Pin not reached #17107 (XL)
- Buffer PNG Lleno #13508 (MK4) #21508 (MK3.9) #23508 (MK3.5)
- Buffer PNG Lleno #17508 (XL)
- Error precalentamiento base #12201 (MINI)
- Error de precalentamiento cabezal impresión #12202 (MINI)
- Error de precarga #10503 (SL1/SL1S)
- Faltan ejemplos de impresión #10523 (SL1/SL1S)
- El ventilador de impresión no está girando
- La impresora no se enciende o sigue apagándose
- El análisis del proyecto falló #10542 (SL1/SL1S)
- El proyecto está dañado #10541 (SL1/SL1S)
- Resolución de problemas de PrusaLink
- Puppy error #17511 (XL)
- Puppy error #17512 (XL)
- Puppy error #17513 (XL)
- Puppy error #17514 (XL)
- What happened?
- How to fix it?
- Puppy error #17515 (XL)
- Error Puppy #17516 (XL)
- Puppy error #17517 (XL)
- Puppy error #17518 (XL)
- Error Puppy #17519 (XL)
- Puppy error #17520 (XL)
- Puppy error #17521 (XL)
- Puppy error #17522 (XL)
- Error de API remota #10407 (SL1/SL1S)
- Nivel de resina bajo # 10712 (SL1/SL1S)
- La medición de resina falló #10124 (SL1/SL1S)
- Error sensor de resina #10307 (SL1/SL1S)
- Resina muy alta #10109 (SL1/SL1S)
- Resina muy baja #10108 (SL1/SL1S)
- Sample G-codes
- Guardar archivo de registro (SL1/SL1S)
- Tarjeta SD no funciona
- Tarjetas SD y unidades USB
- Fallo Selftest (XL)
- Fallo en la verificación de la firma #12606 (MINI/MINI+)
- Fallo en la verificación de la firma #13606 (MK4) #21606 (MK3.9) #23606 (MK3.5)
- Error SL1 Mecanismo inclinación
- Monstruo de espagueti
- Cómo cuadrar tu MINI
- Explicación LED de estado (MK4/XL)
- Status LED explained (MMU3)
- Stuck filament detection #13101 (MK4) #21101 (MK3.9) #17108 (XL)
- Tangled filament
- Temp no cuadra base calefactable #12209 (MINI/MINI+)
- Temp no cuadra cabezal de impresión #12210 (MINI/MINI+)
- Temperatura fuera de rango #10208 (SL1/SL1S)
- Deriva térmica en la base #12203 (MINI)
- Deriva térmica en el fusor #12204 (MINI)
- Corto driver TMC #04304 (MMU)
- Corto driver TMC #04314 (MMU)
- Corto driver TMC #04324 (MMU)
- Tool offset out of bounds #17104 (XL)
- Error cambiador #17101 (XL)
- Fallo en movimiento de la torre #10118 (SL1/SL1S)
- No autorizado #10406 (SL1/SL1S)
- Error inesperado #10501 (SL1/SL1S)
- Error inesperado MC #10306 (SL1/SL1S)
- Modelo de impresora desconocido #10323 (SL1/SL1S)
- Versión BBF no compatible #12614 (MINI/MINI+)
- Versión BBF no compatible #13614 (MK4) #21614 (MK3.9) #23614 (MK3.5)
- Unsupported Buddy FW #17611 (XL)
- Unsupported firmware BBF file #17614 (XL)
- Unsupported printer model #17610 (XL)
- Tipo de impresora no compatible #12610 (MINI/MINI+)
- Tipo de impresora no compatible #13610 (MK4) #21610 (MK3.9) #23610 (MK3.5)
- Versión de impresora no compatible #12611 (MINI/MINI+)
- Versión de impresora no compatible #13611 (MK4) #21611 (MK3.9) #23611 (MK3.5)
- Sobrecorriente Dispositivo USB #13307 (MK4) #21307 (MK3.9) #23307 (MK3.5)
- USB Device Overcurrent #17307 (XL)
- Dispositivo USB no detectado #10528 (SL1/SL1S)
- USB flash drive not connected #17602 (XL)
- USB flash error #17613 (XL)
- USB no conectado #12602 (MINI/MINI+)
- USB no conectado #13602 (MK4) #21602 (MK3.9) #23602 (MK3.5)
- Sobrecorriente Puerto USB #13306 (MK4) #21306 (MK3.9) #23306 (MK3.5)
- USB Port Overcurrent #17306 (XL)
- Fallo lectura temperatura LED UV #10209 (SL1/SL1S)
- Error de voltaje del led UV #10309 (SL1)
- Vibración al imprimir (MK3S+/MK2.5S)
- Modelo de impresora incorrecto #10544 (SL1/SL1S)
- Revisión incorrecta del controlador de movimiento #10301 (SL1)
- XY position invalid #17106 (XL)
- XY probe unstable #17105 (XL)
- Códigos QR de error
- Mensajes de Error de Impresión
What happened?
On the Original Prusa XL, communication with the peripheral boards (e.g. Dwarf board) is achieved using the MODBUS protocol. In MODBUS, there are two types of devices: the master and the slave, also known, respectively, as client and server. On Original Prusa XL firmware, the master is the XLBuddy, and each slave is called puppy.
After assigning an address to each puppy, the XLBuddy establishes communication with a specific puppy by sending a request. If the puppy does not respond to the request, the printer will show the message: "Puppy # not responding".
Error name: Puppy not responding
Error code: #17514
The error message will specify the name of the puppy that is not responding.
How to fix it?
Re-flash firmware
Download the firmware, and transfer it to your USB drive. Make sure to unmount the drive from your operating system before physically removing it.
Insert the USB drive back into the printer and reboot the printer using the reset button directly next to the knob to initiate the flashing procedure. In case the procedure does not start, reboot the printer again by pressing the same reset button, and while the printer is booting up, press once the rotating knob.
A visual inspection
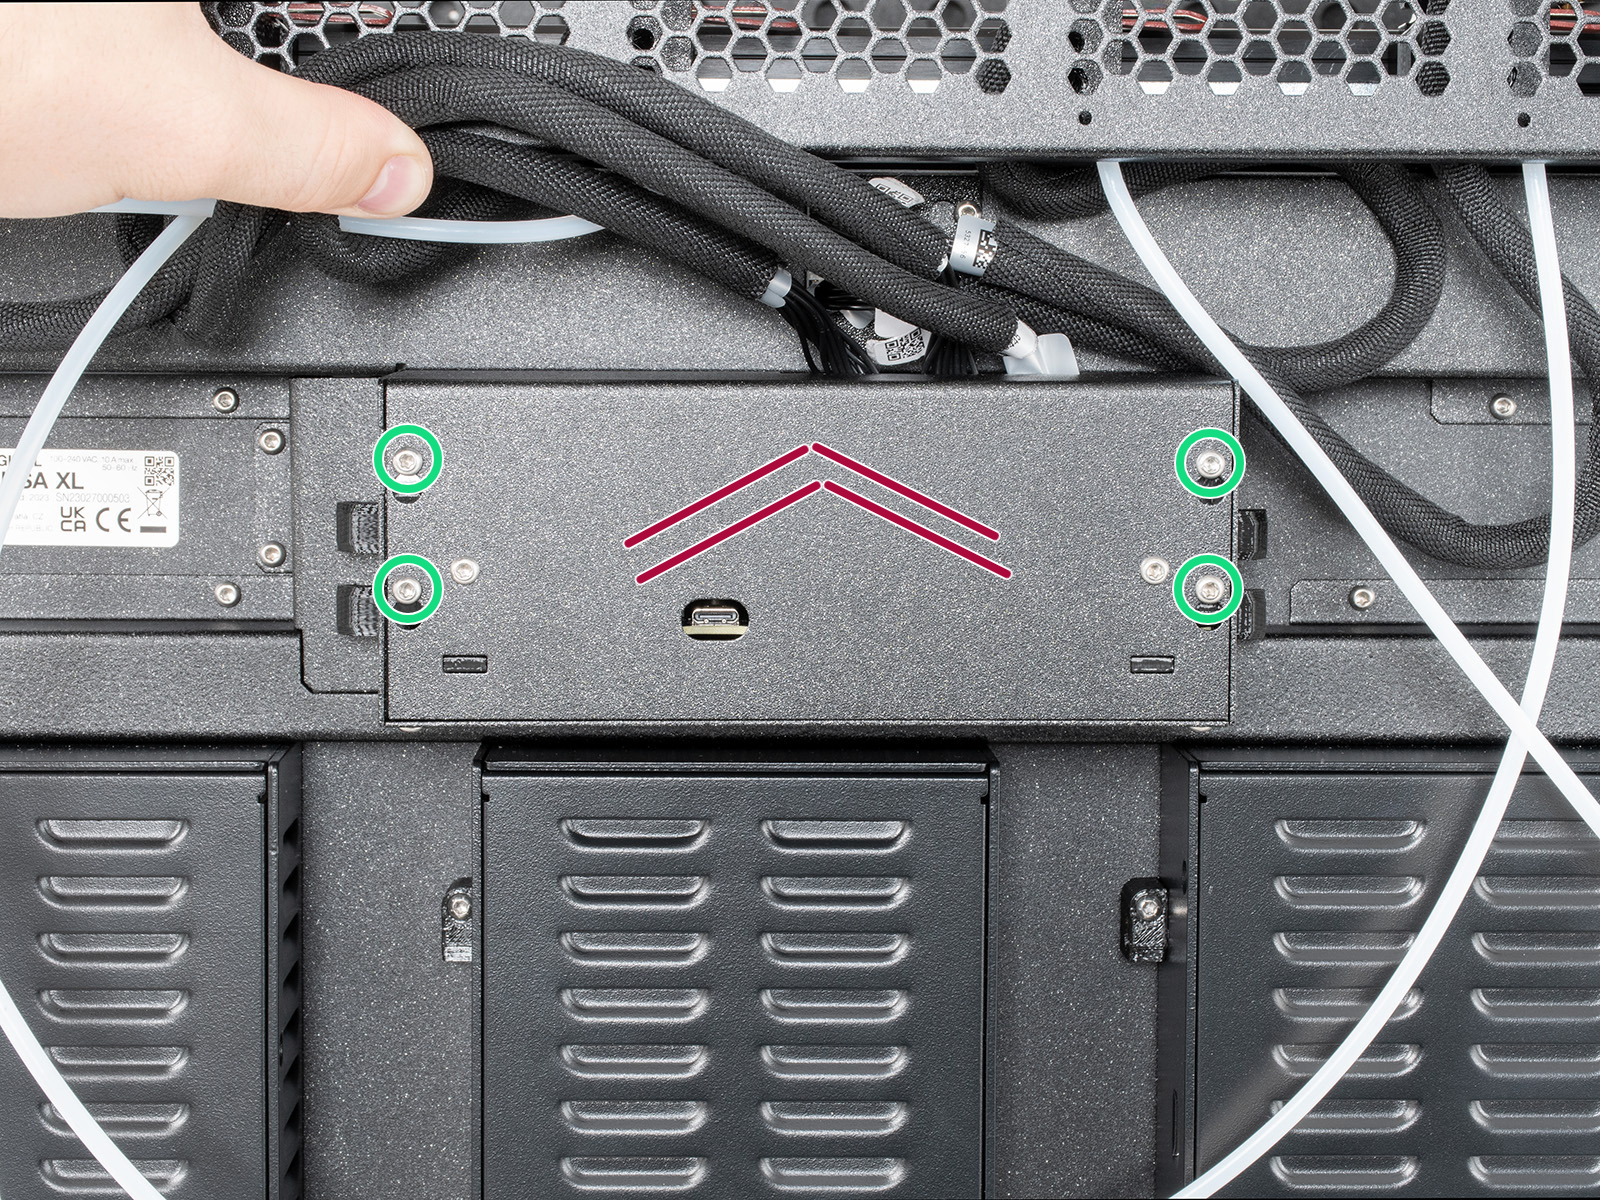
From the rear of the printer, loosen the indicated four screws. It is not necessary to remove them completely. Then, slide up the electronics cover to remove it. This will expose the XLBuddy board, part of the Sandwich board, and if present, the XL-Splitter.
 | 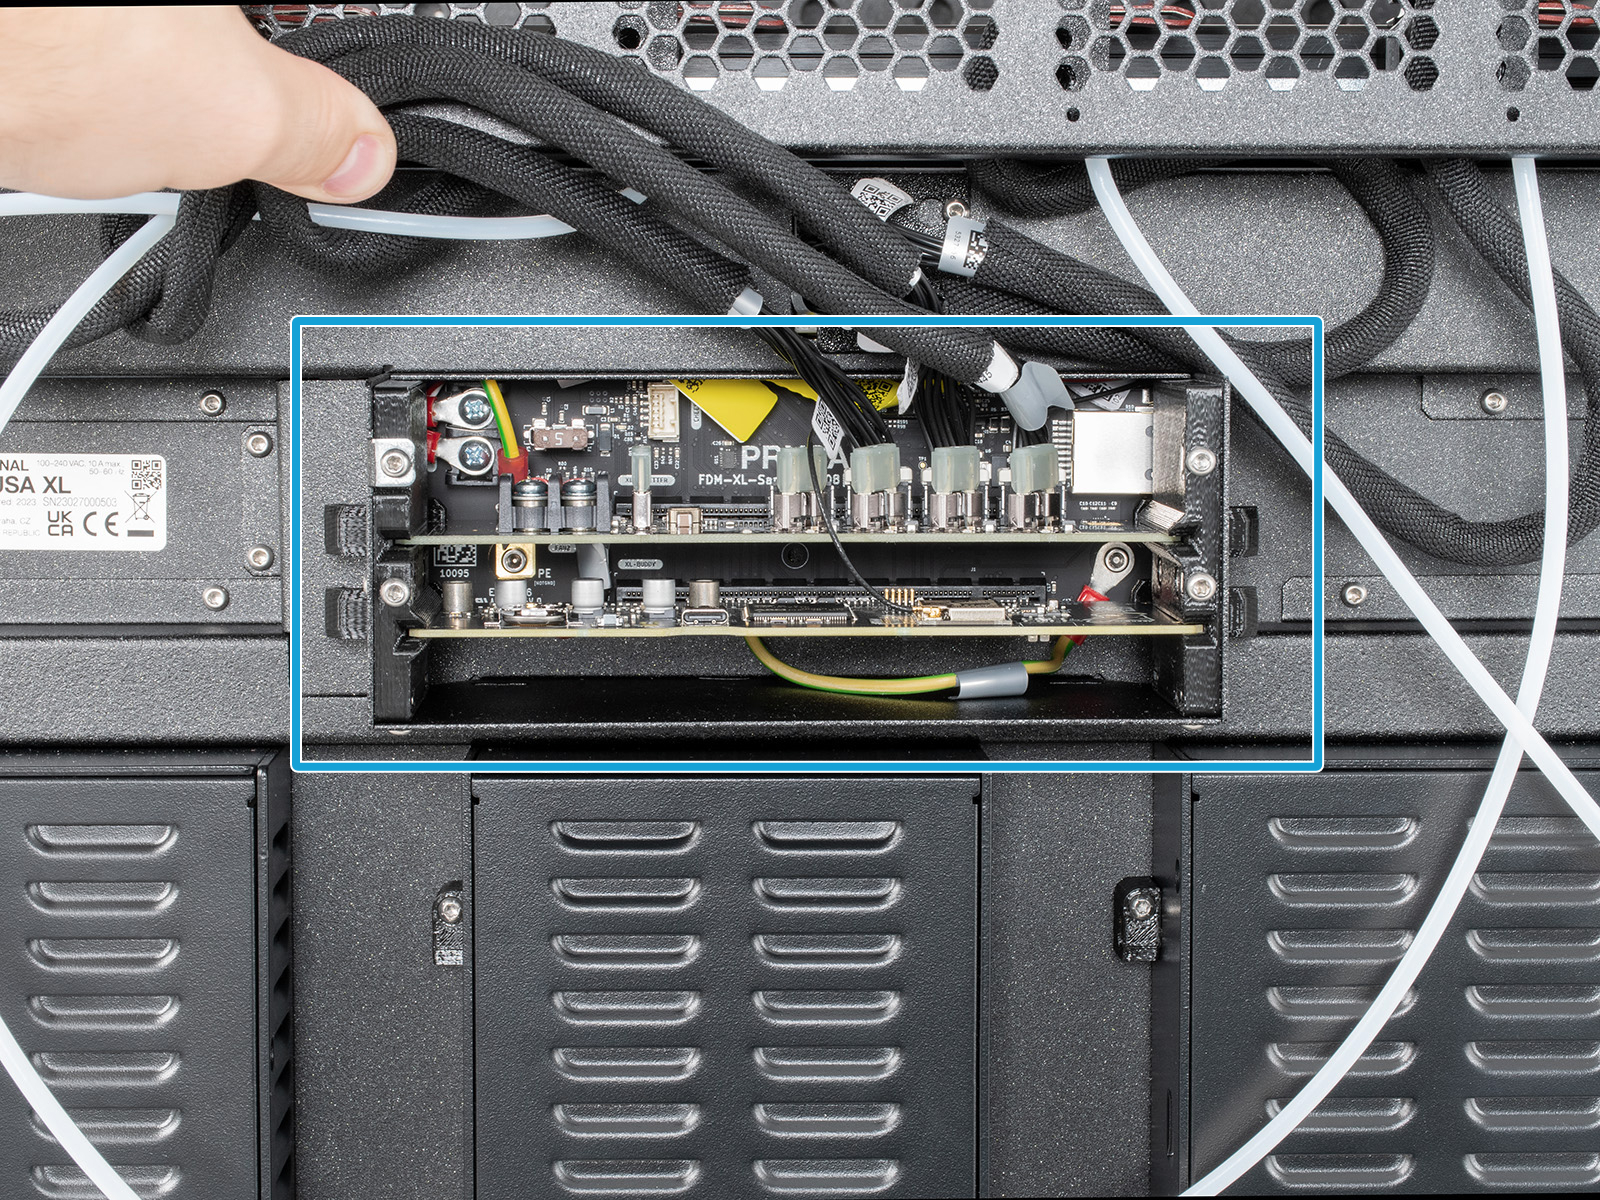 |
Inspect the boards, in particular the XLBuddy. Check for defects or damage on the surface, such as a detached component, or a visibly burnt spot.
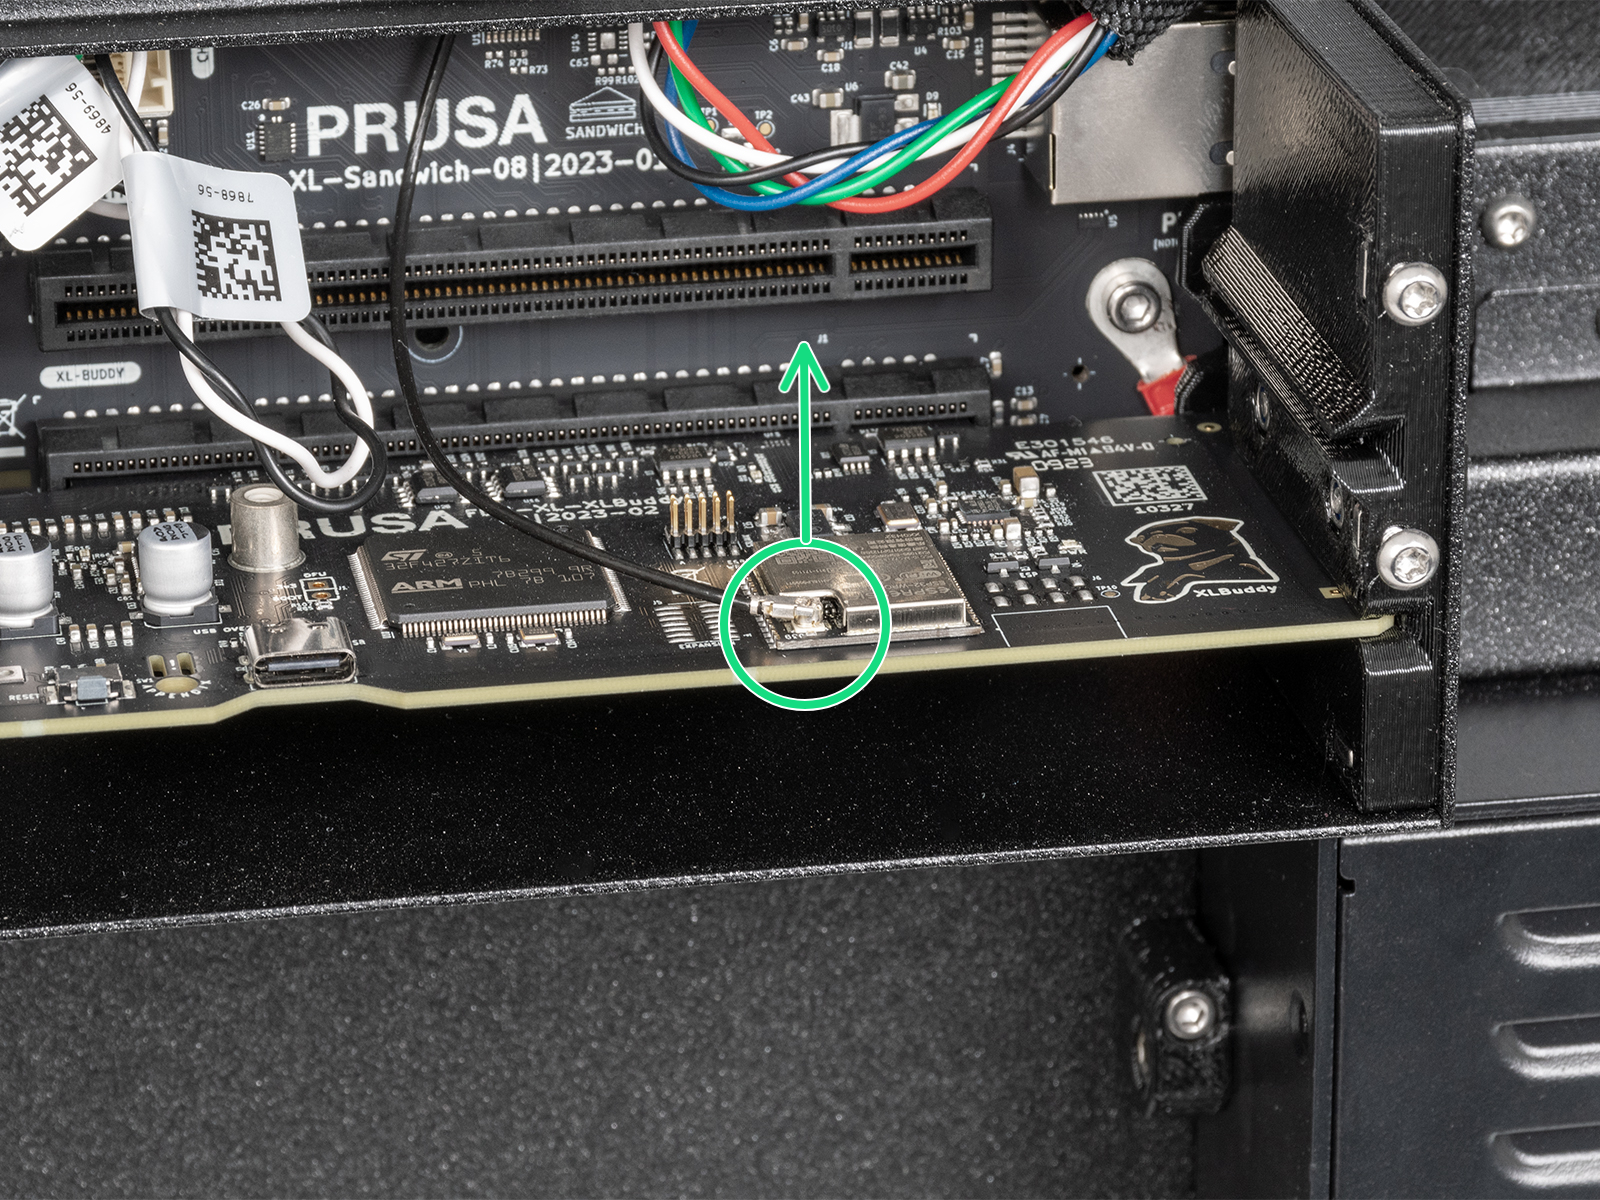
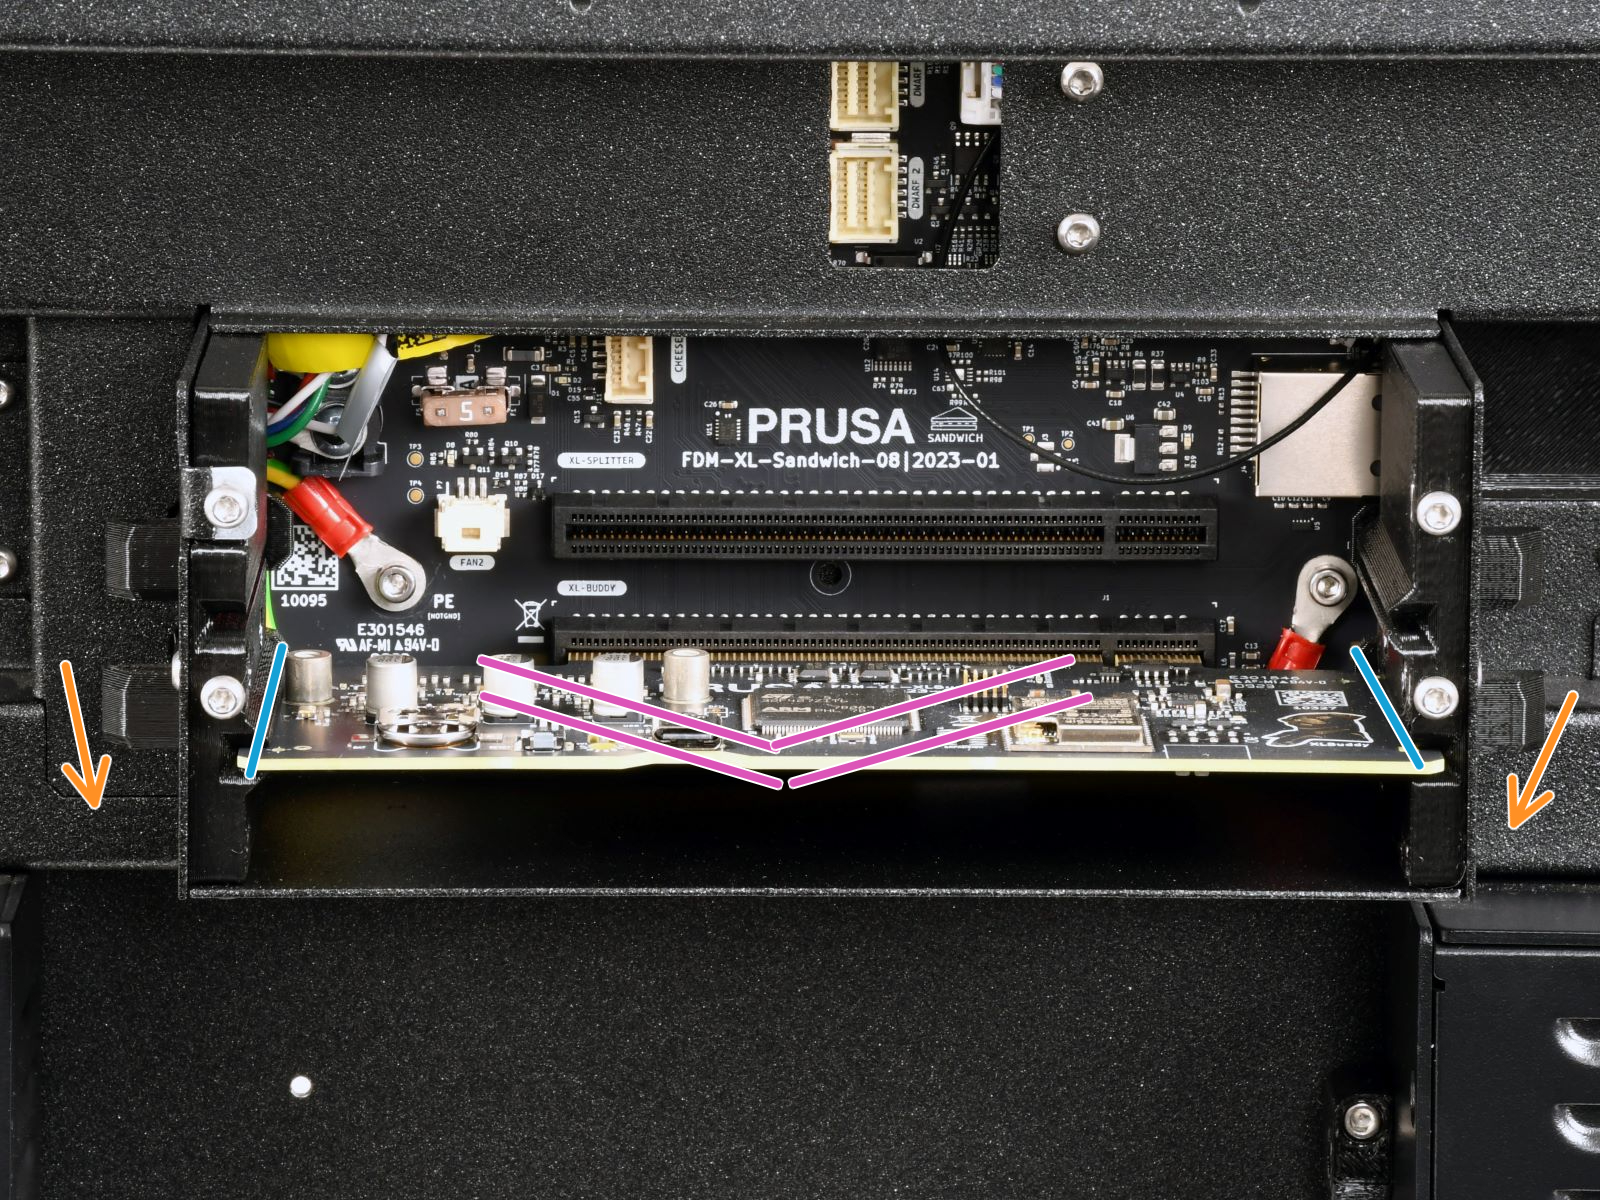
If needed, disconnect the antenna cable from the XLBuddy board, and extract the XLBuddy board, using the two lower ejectors. Touch any electronic board only from its edges to avoid damaging its components.
 |  |
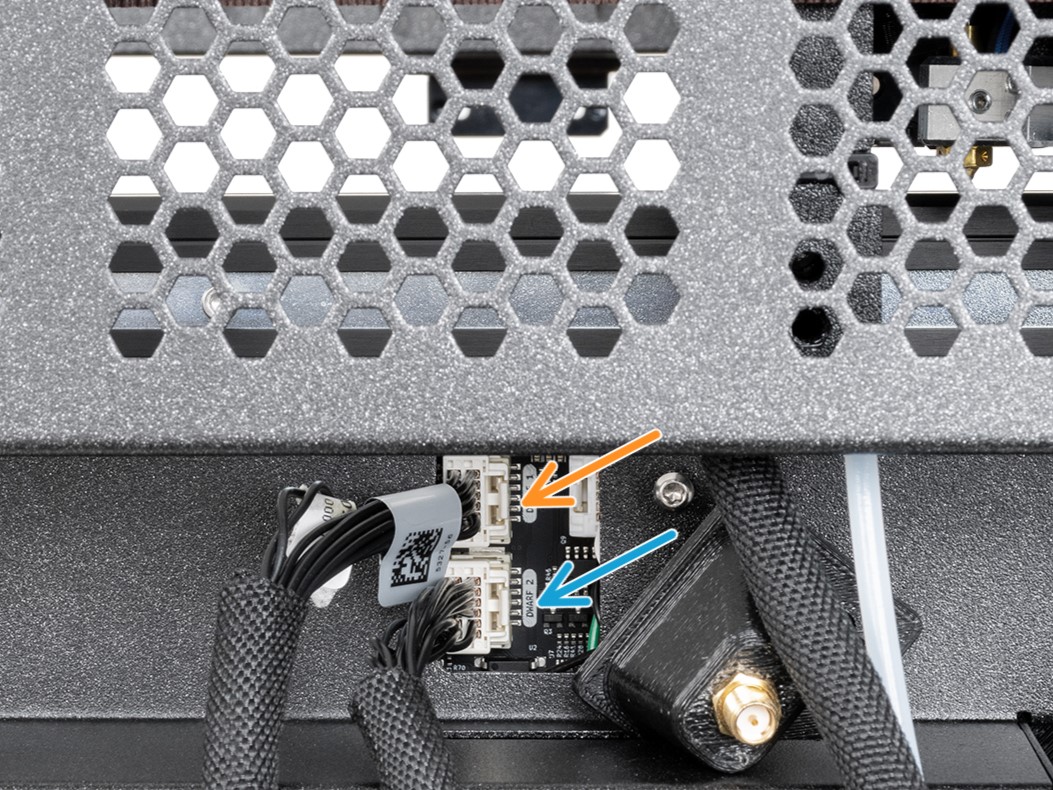
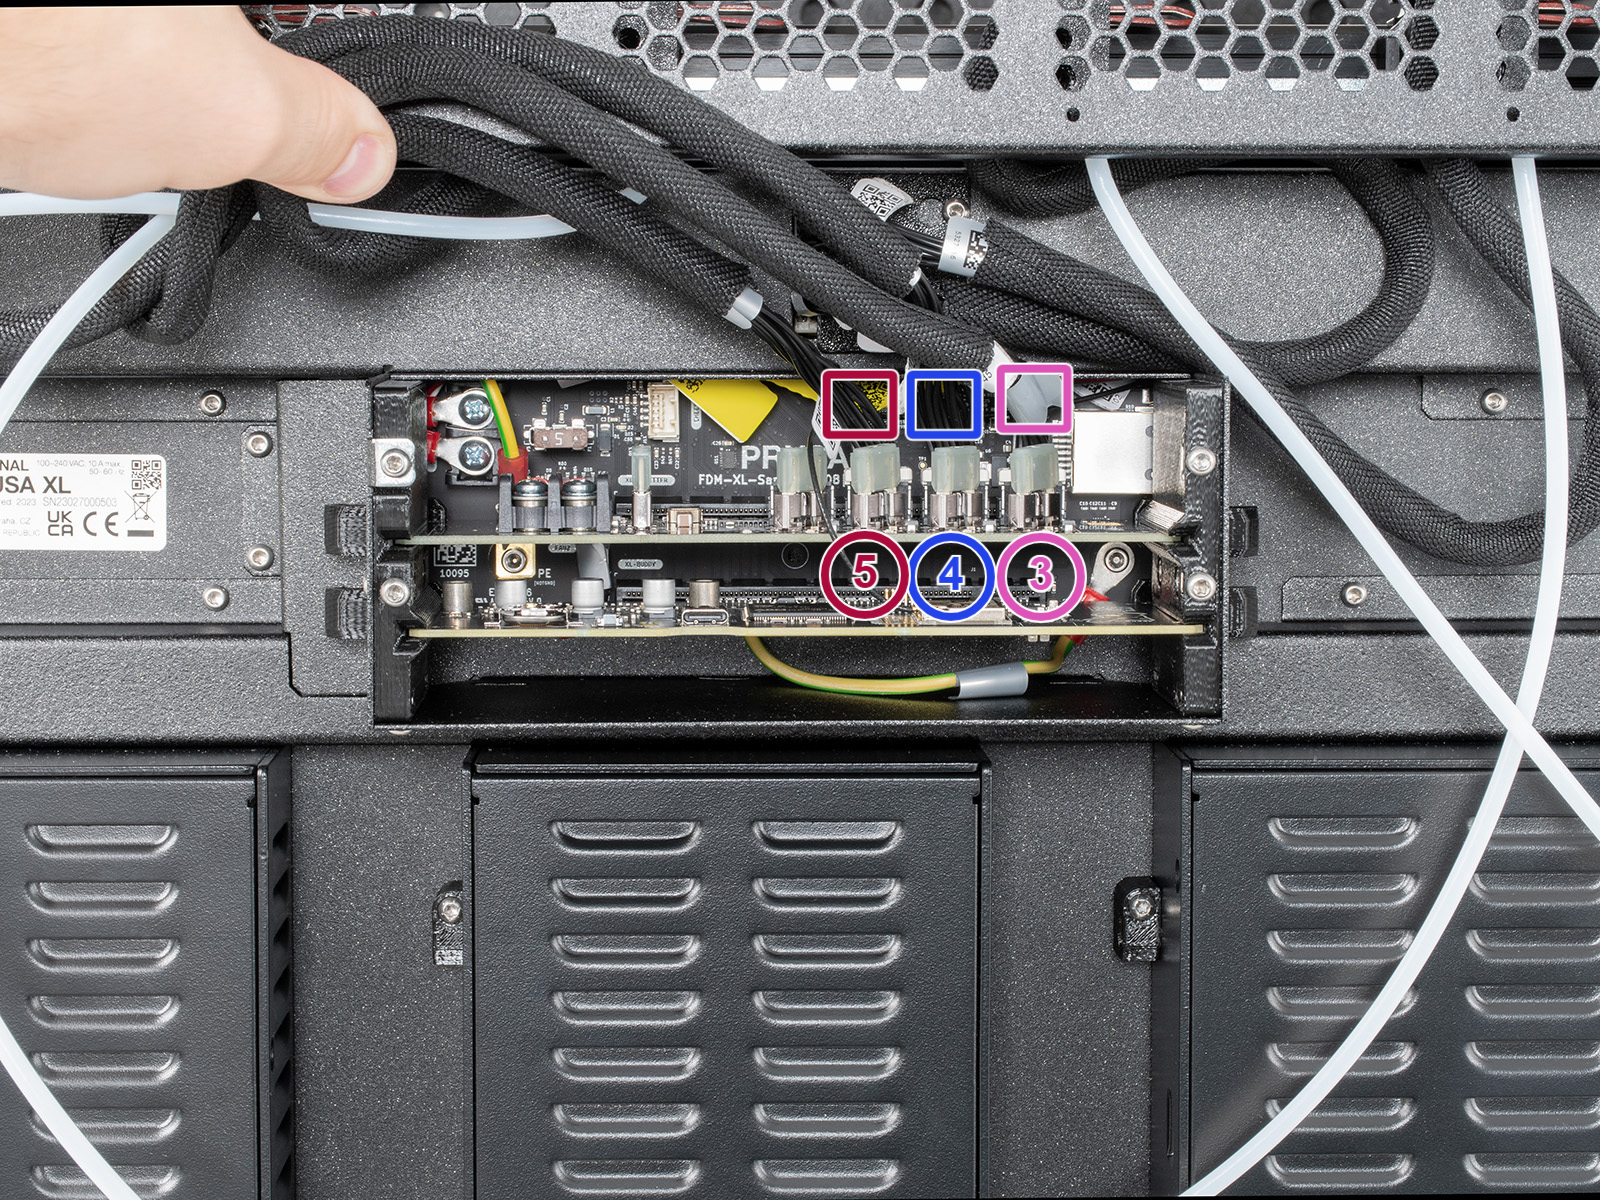
Sandwich/XL-Spitter - Nextruder cables
Inspect the Nextruder cables and their connectors, both from the electronic board side and from the Dwarf board side on each Nextruder. Check for any incorrect or loose connections or damage on the cables and connectors.
For Nextruder 1 and 2, the cables are connected to the top center of the Sandwich board. More reference is on the linked guide, for printers with rear antenna, and printers with side antenna.
For Nextruder 3, 4, and 5, the cables are connected to the XL-Splitter board.
 |  |
Comentarios


¿Todavía tienes preguntas?
Si tienes alguna pregunta sobre algo que no se ha tratado aquí, comprueba nuestros recursos adicionales.
Y si eso no lo soluciona, puedes enviar una petición a [email protected] o mediante el botón que hay más abajo.