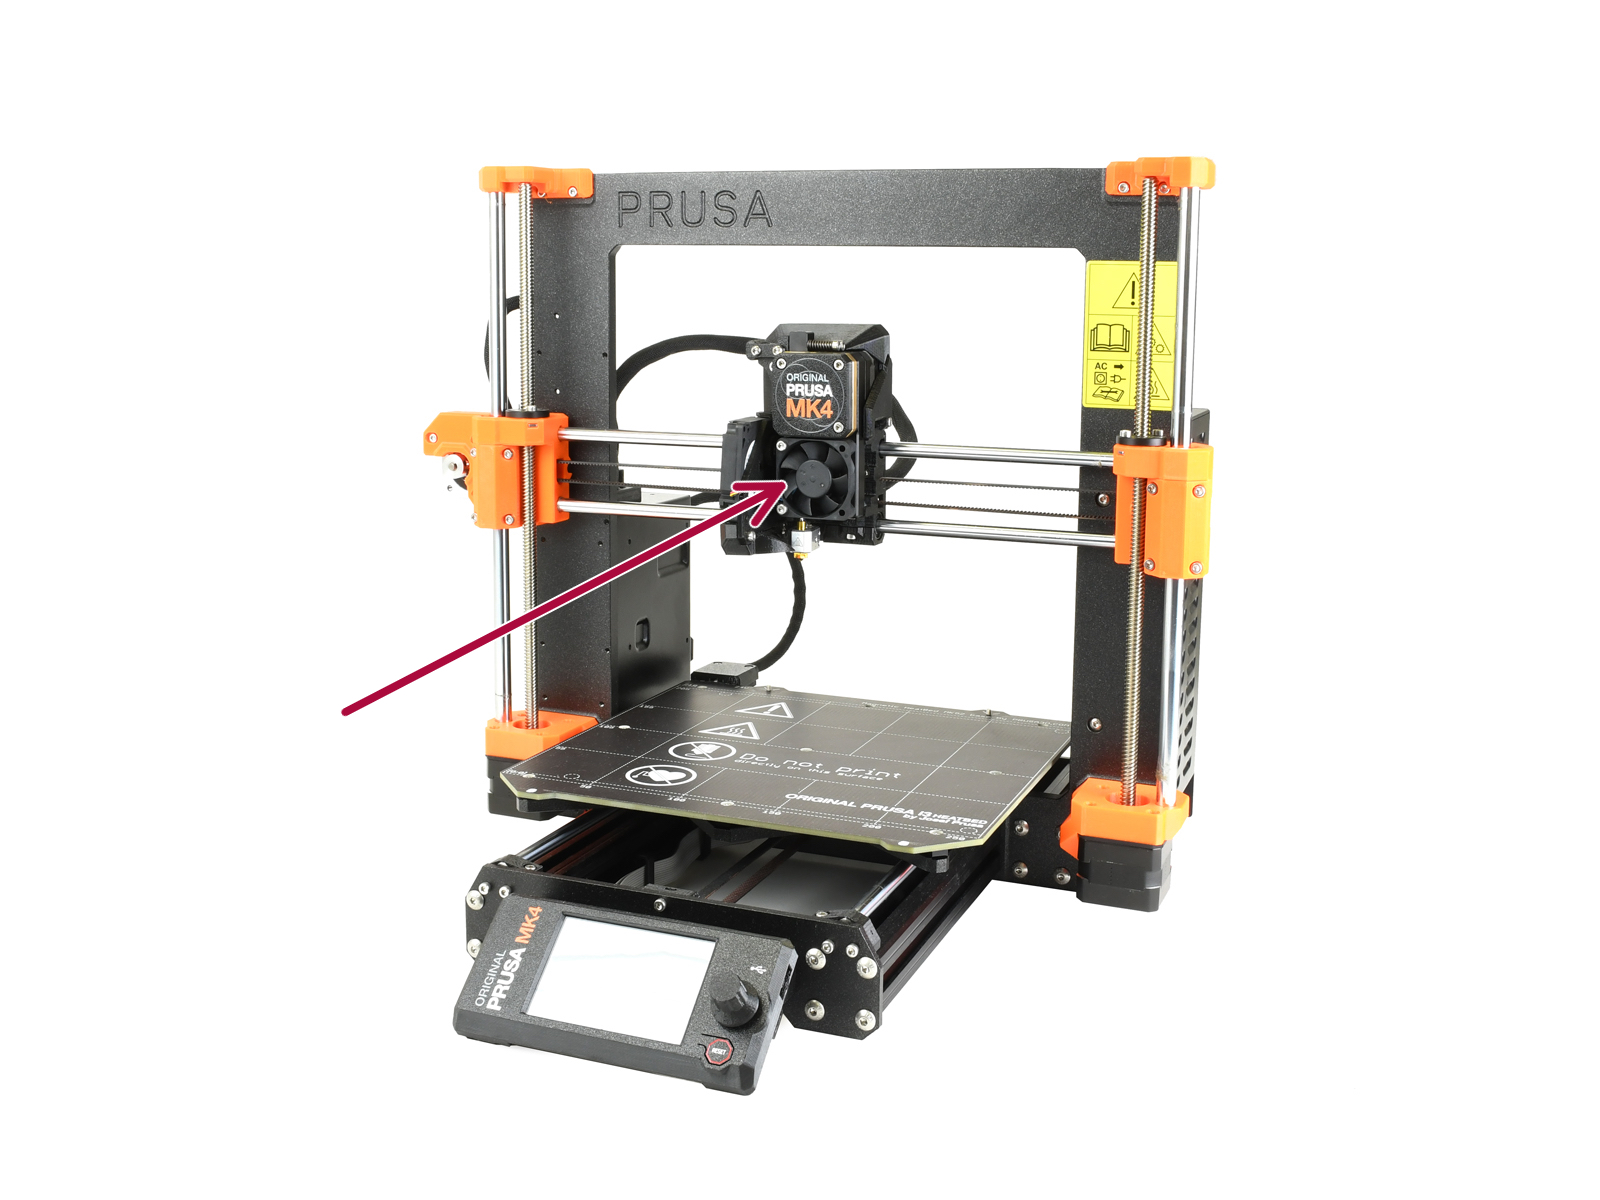
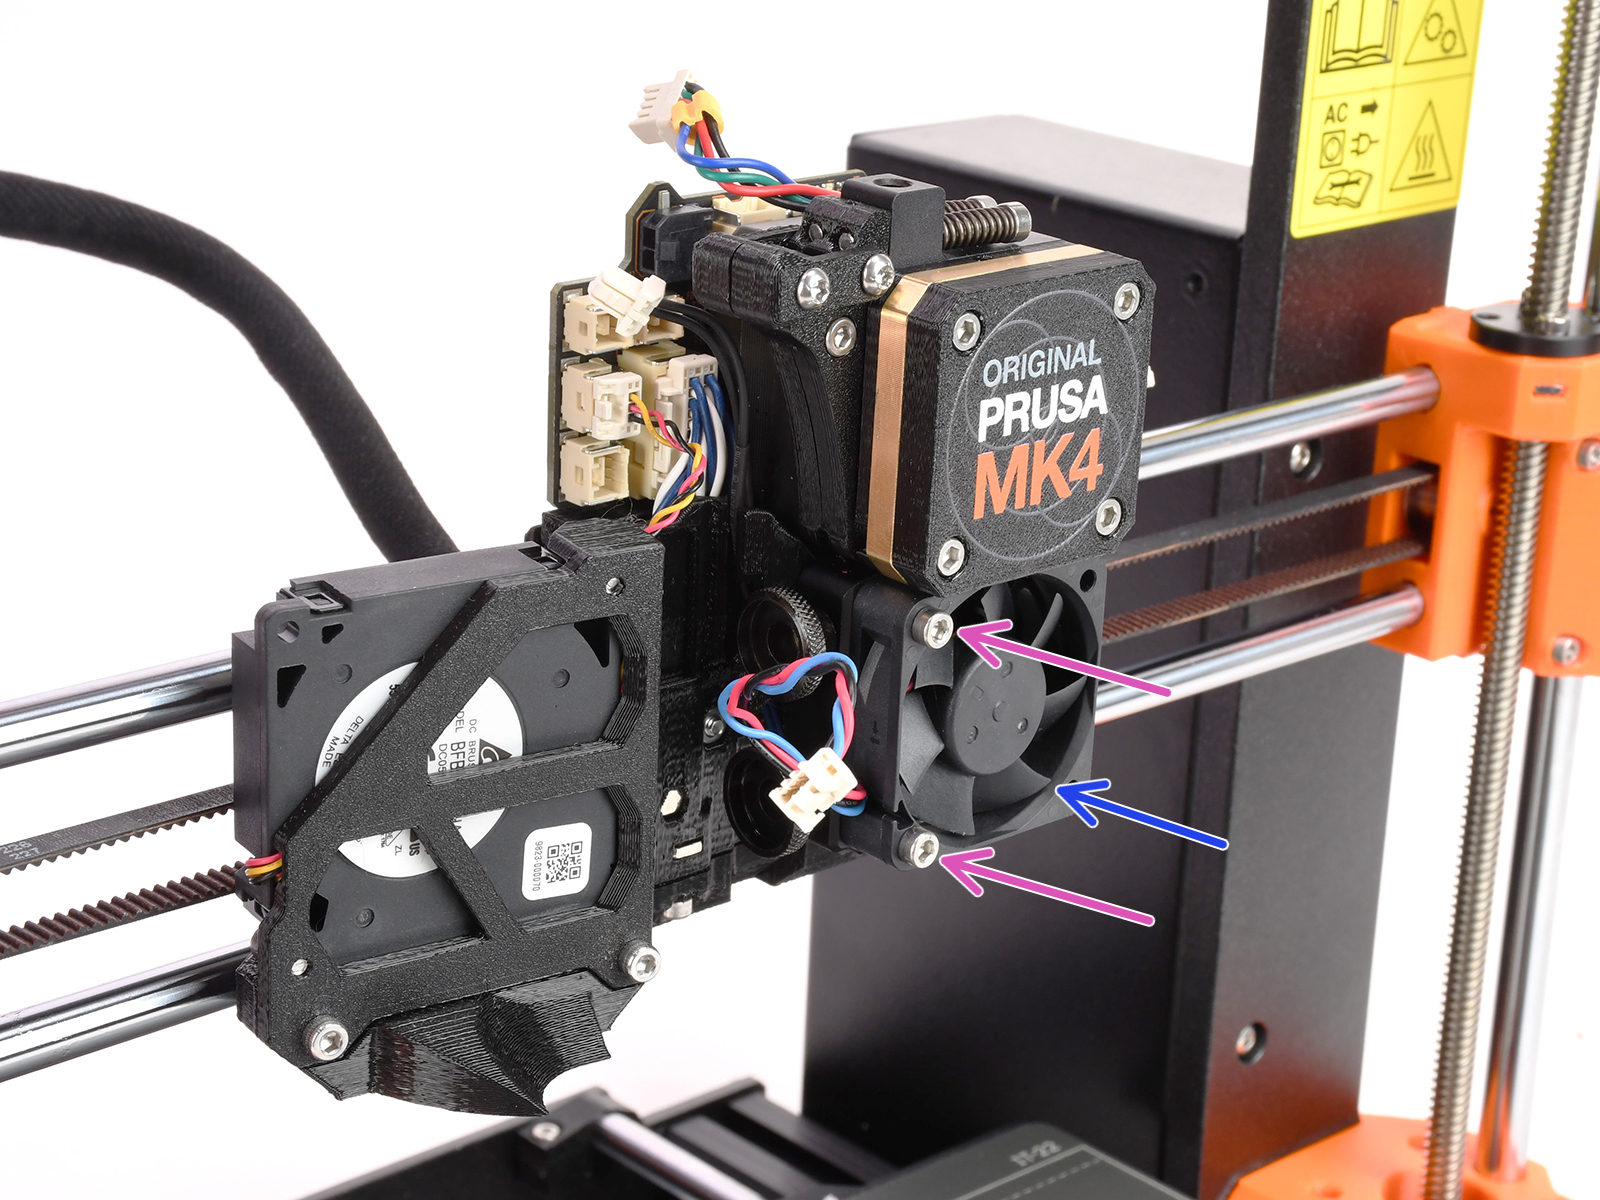
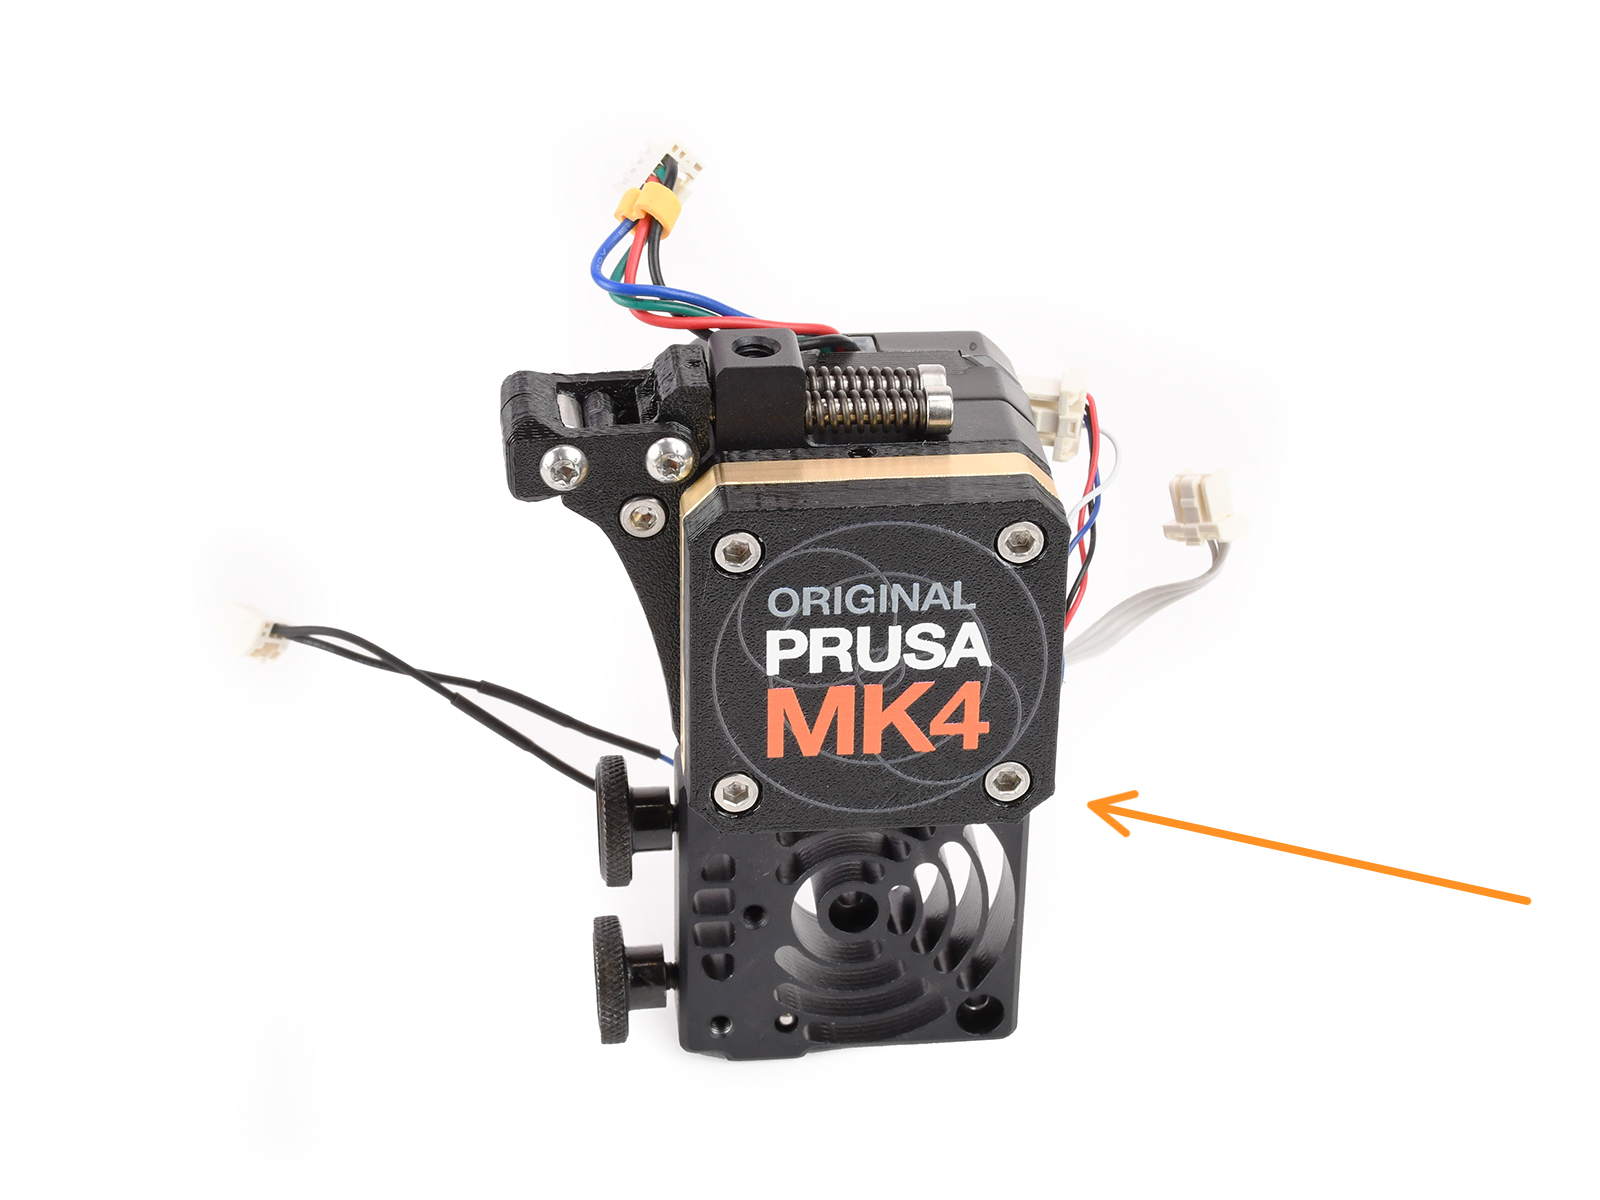
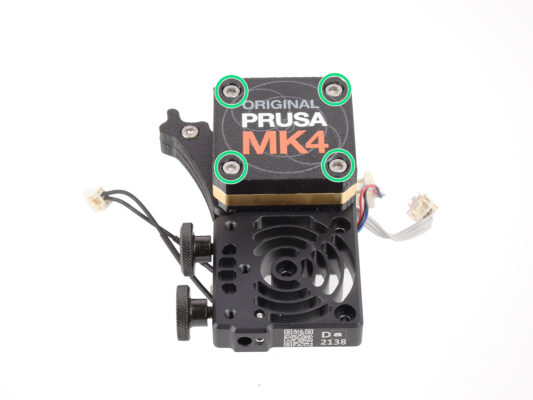
JA
  • English
  • Čeština
  • Italiano
  • Deutsch
  • Polski
  • Français
Login

How to replace a hotend heatsink (MK4 / MK3.9)

Menu

How to replace a hotend heatsink (MK4 / MK3.9)

How to replace a hotend heatsink (MK4 / MK3.9)
Relevant for:
Last updated 10 days ago
How to replace a hotend heatsink (MK4 / MK3.9)
 Difficulty
Difficult
 Steps
41
 Available languages
ENCSPLDEITFR
Introduction
Introduction
This guide will take you through the Hotend Heatsink replacement on your Original Prusa MK4 or MK3.9.
All necessary parts are available in our eshop prusa3d.com.
Note that you have to be logged in to have access to the spare parts section.
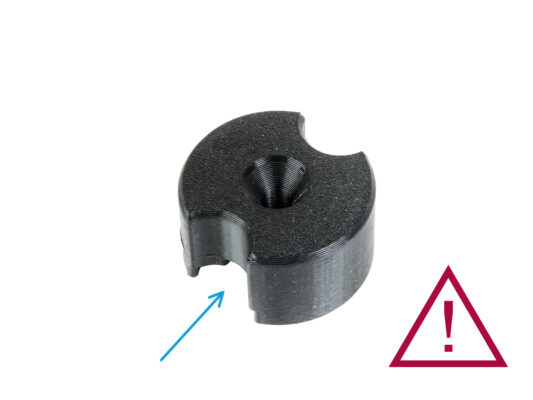
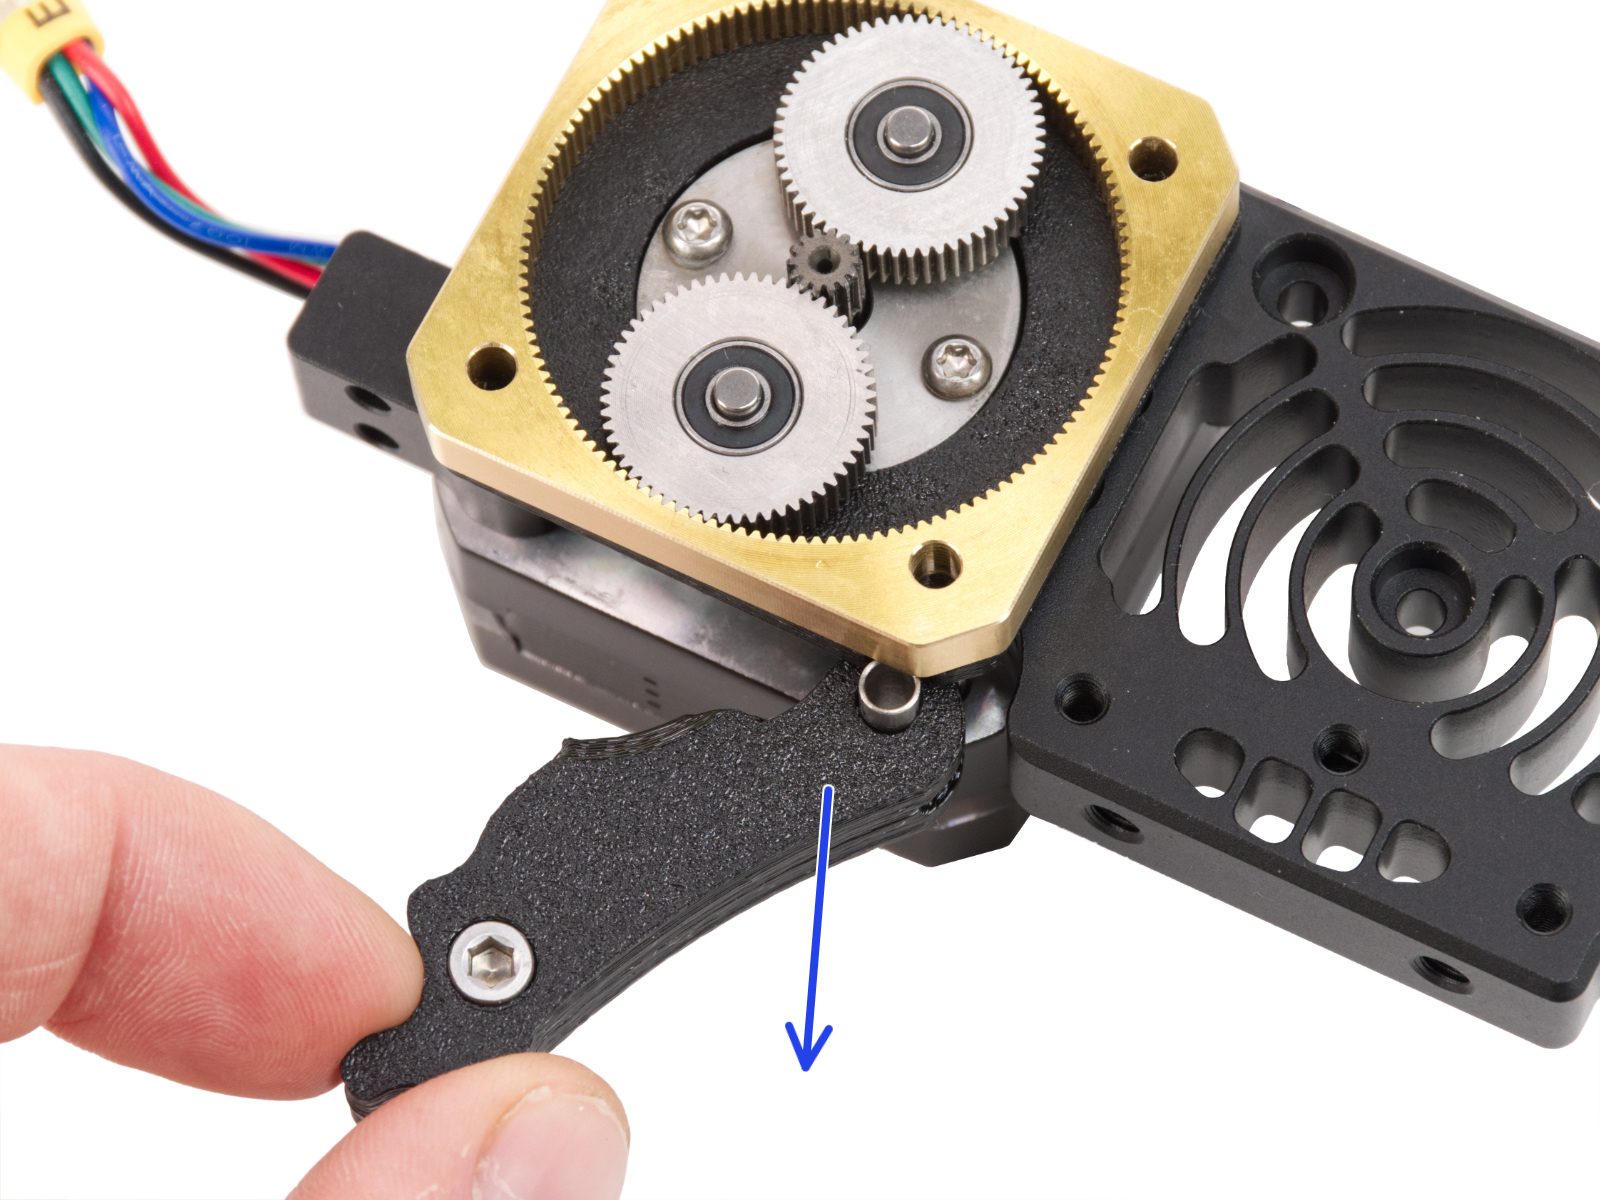
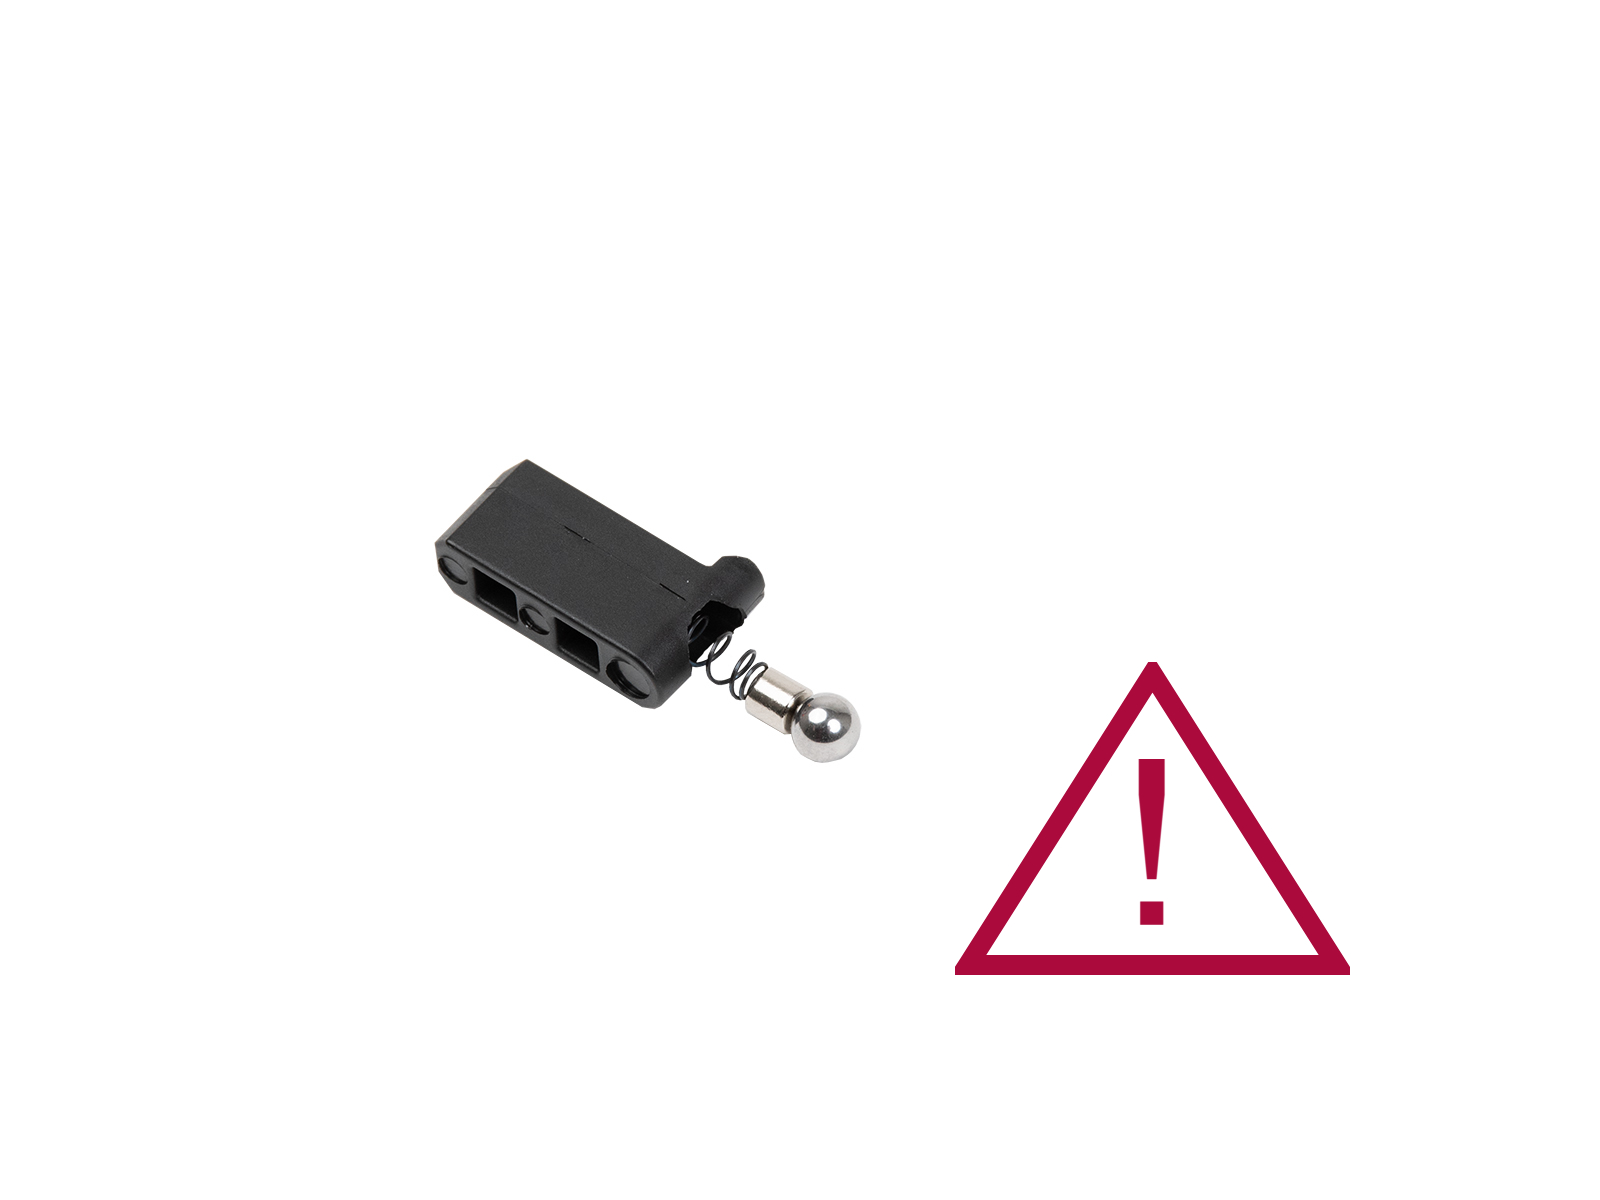
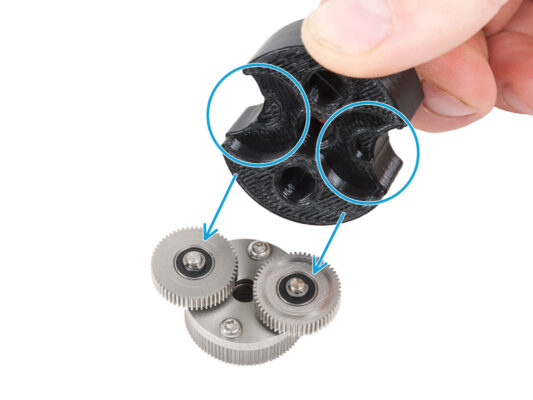
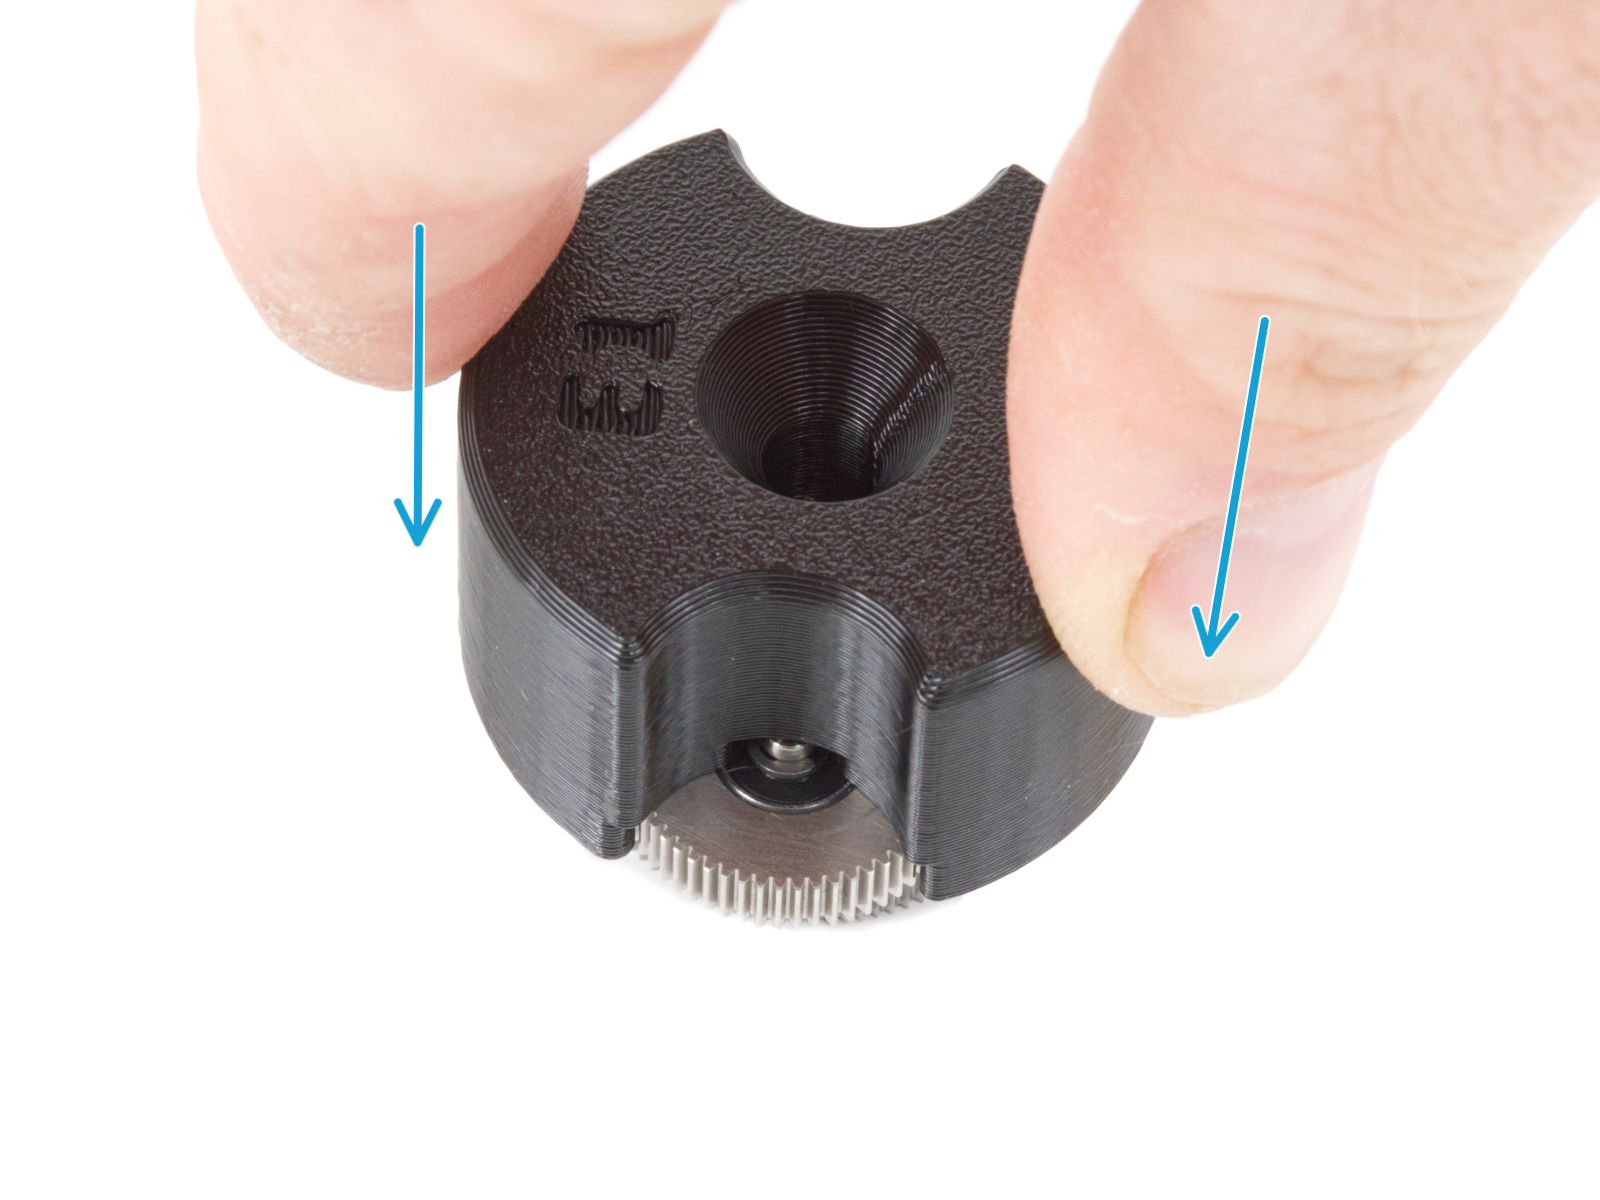
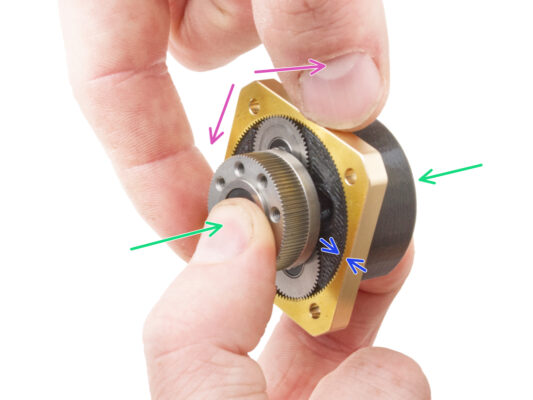
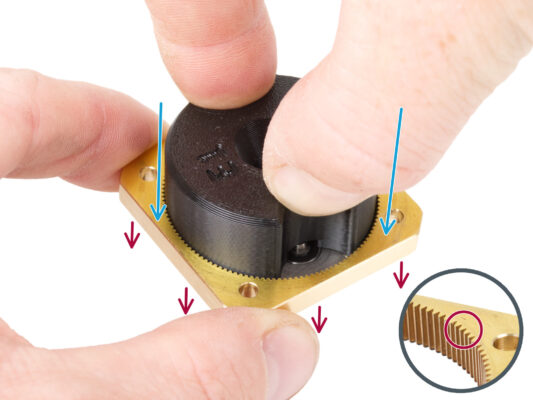
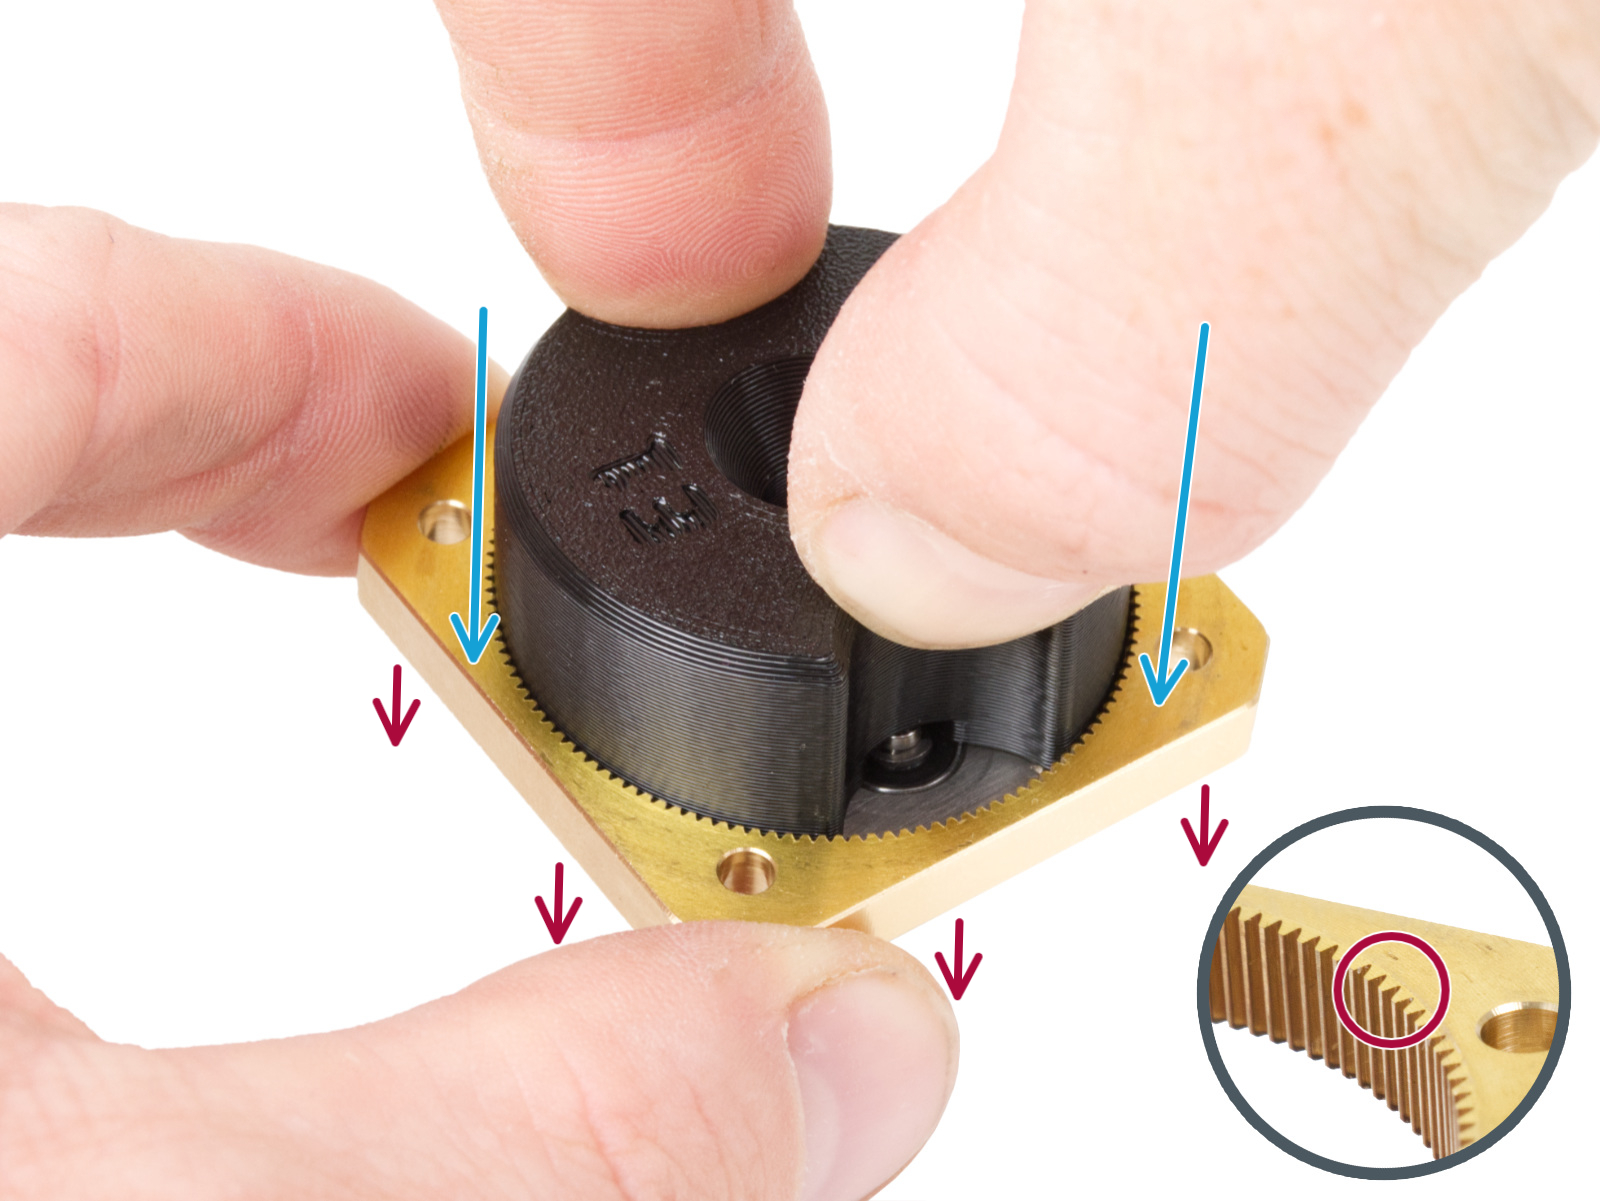
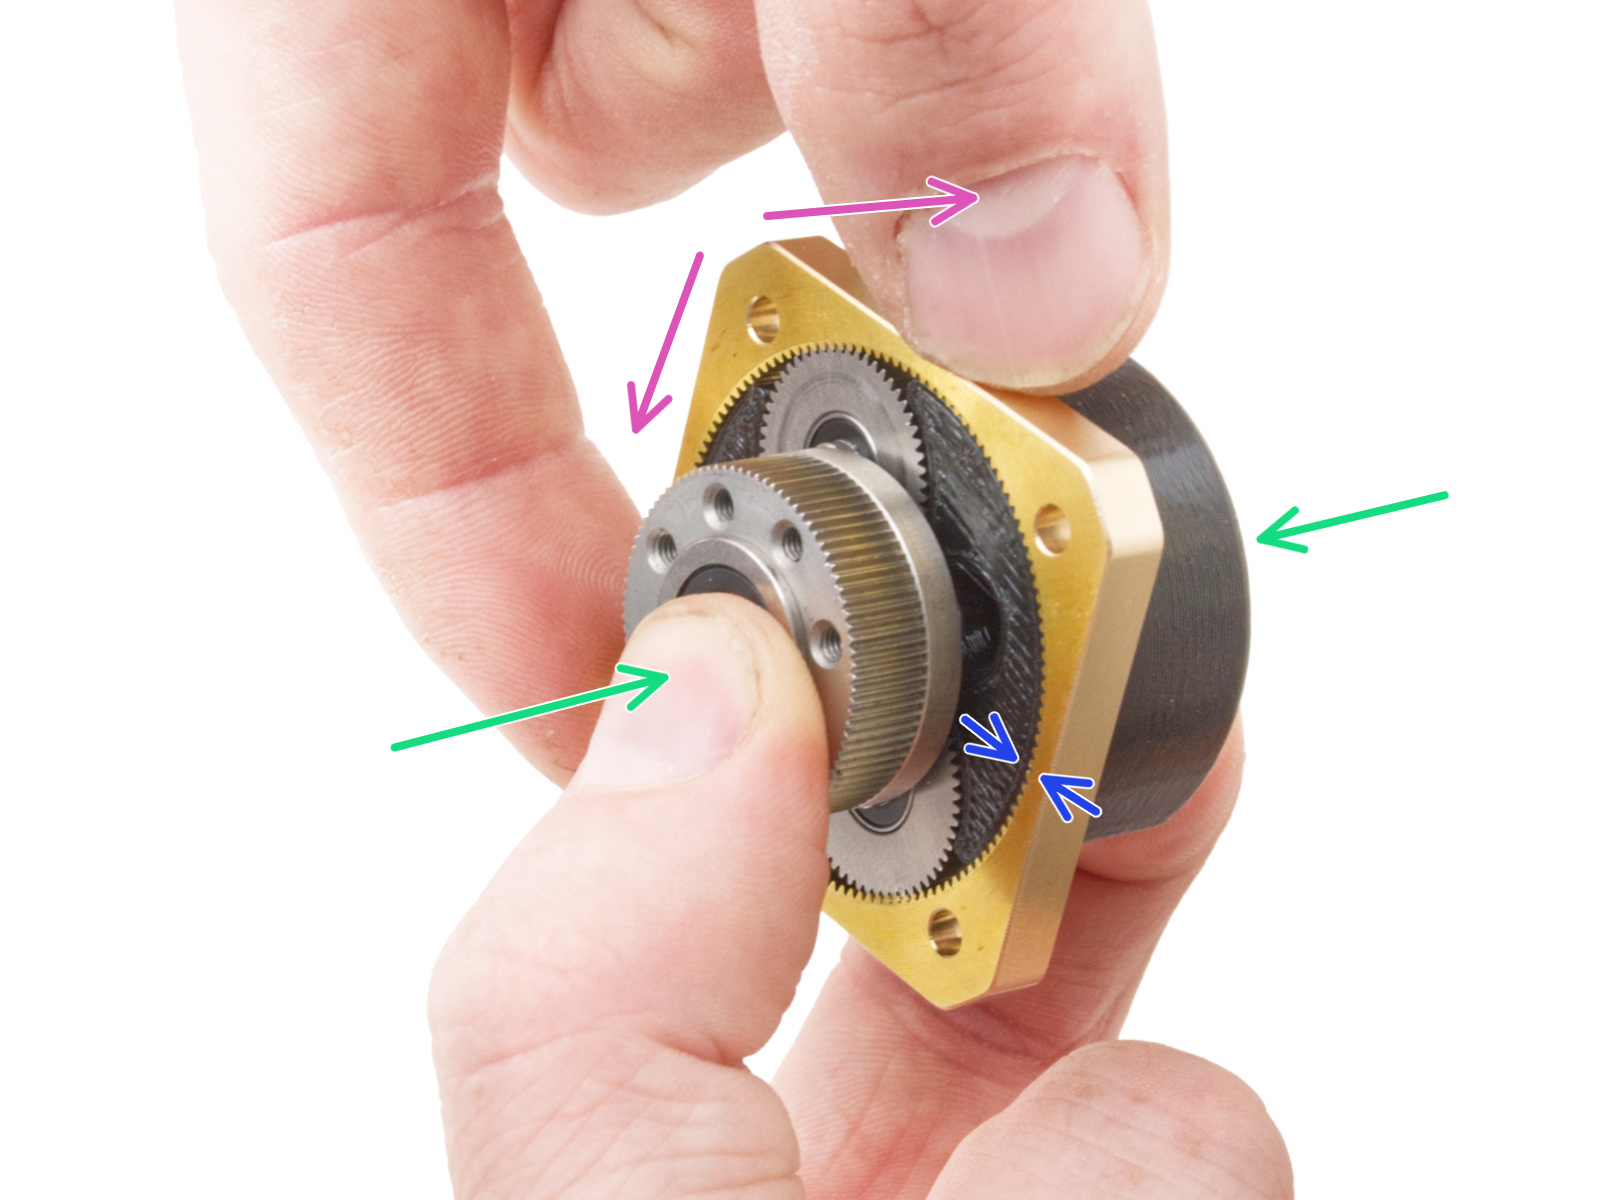
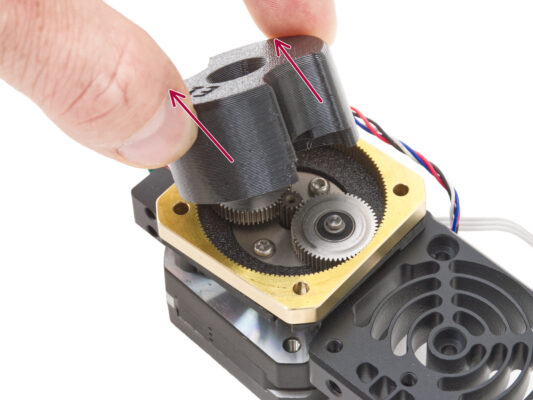
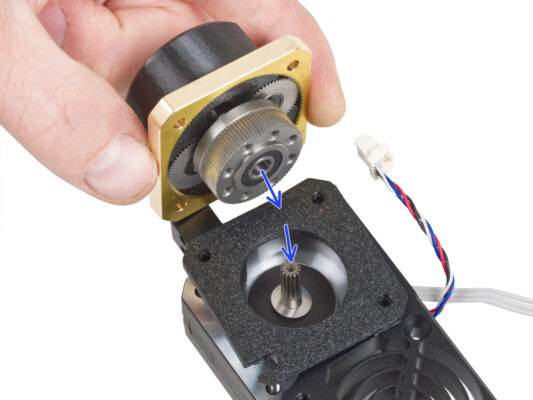
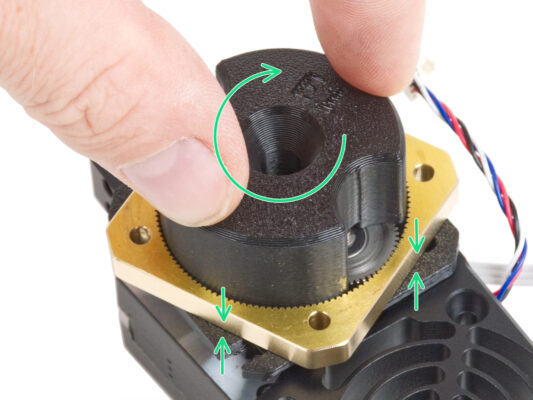
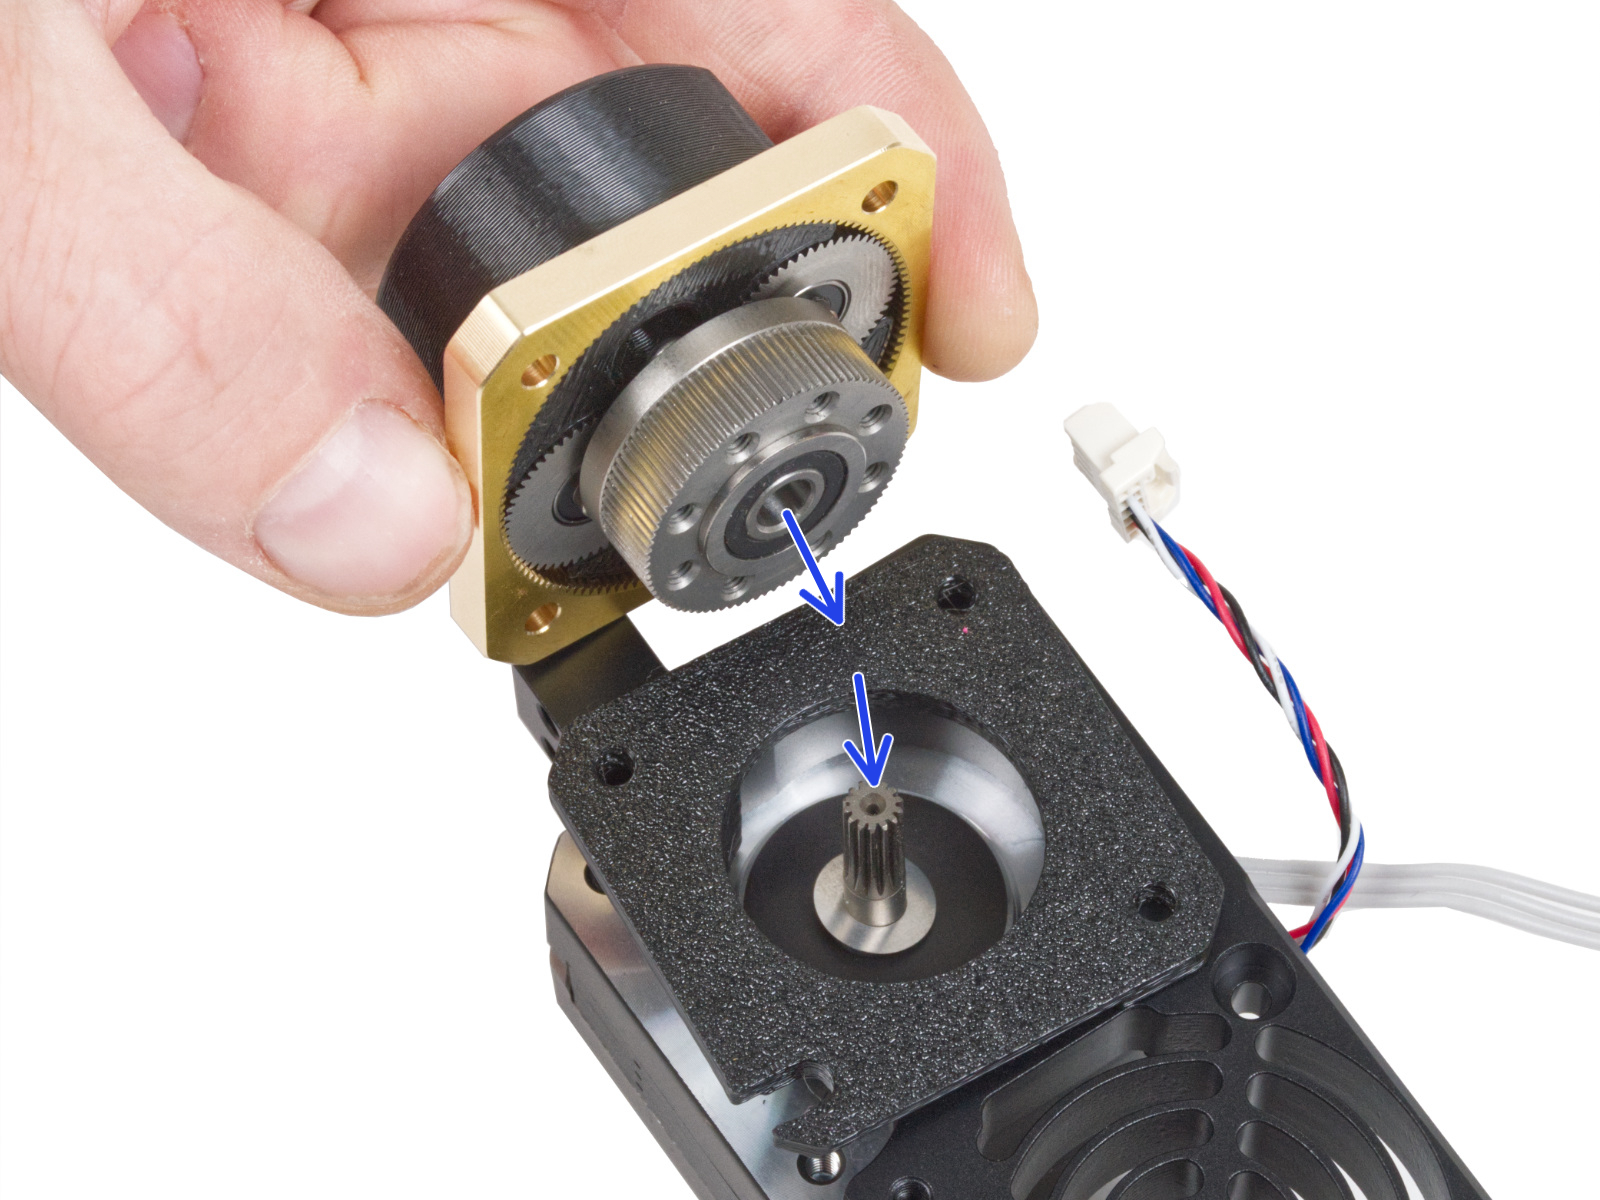
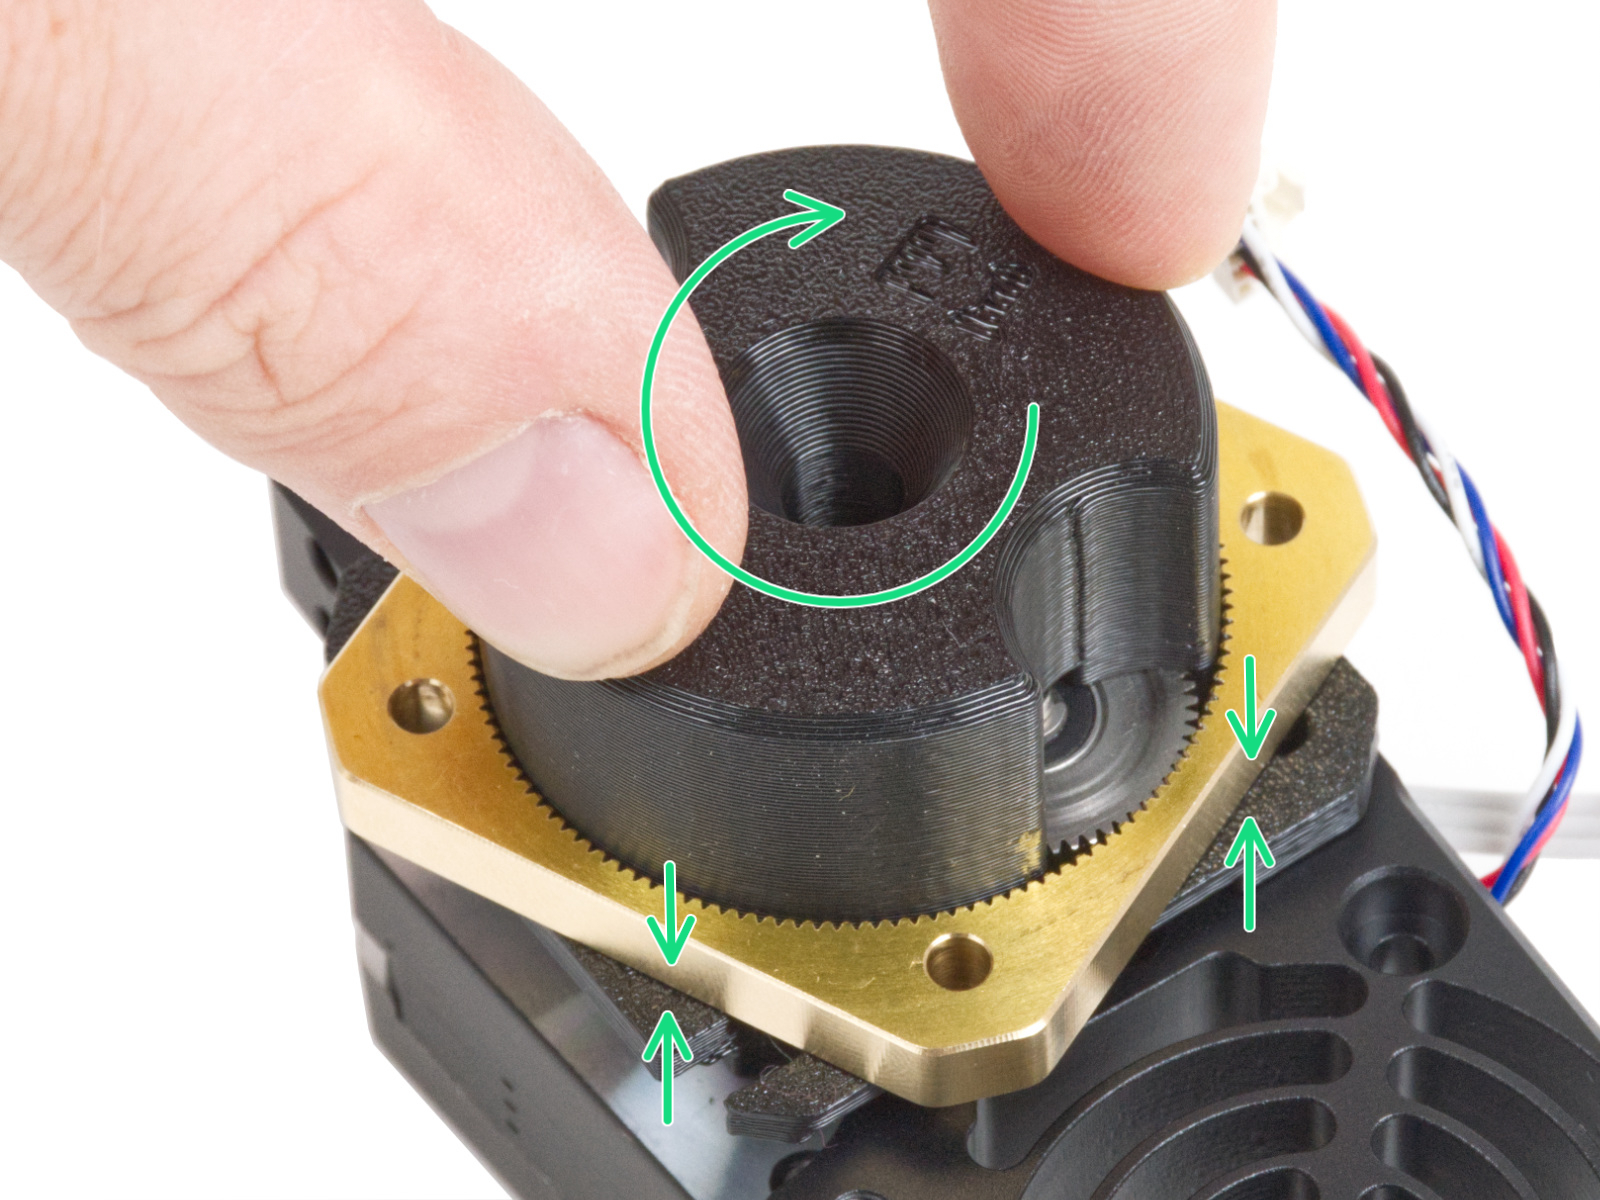
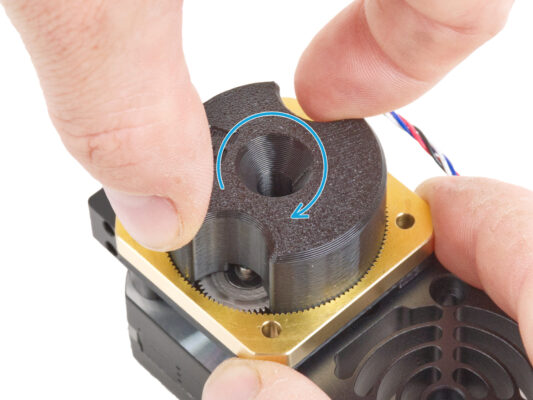
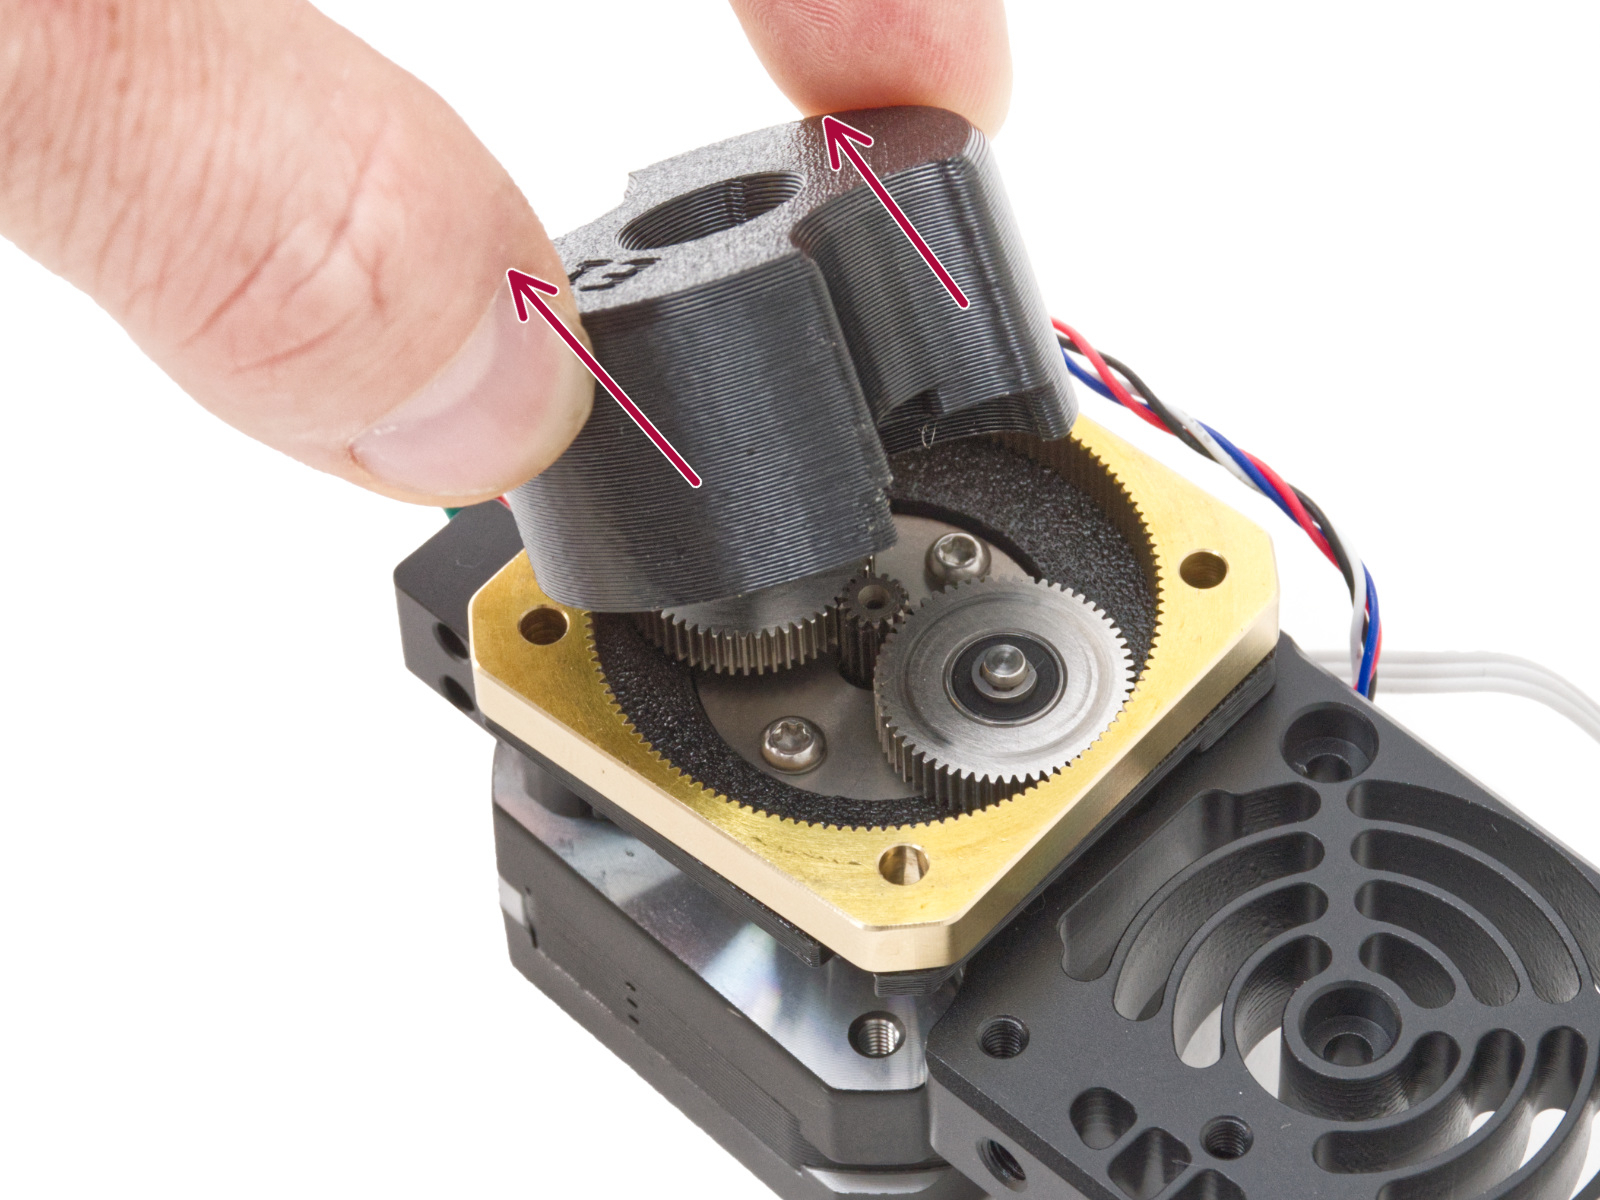
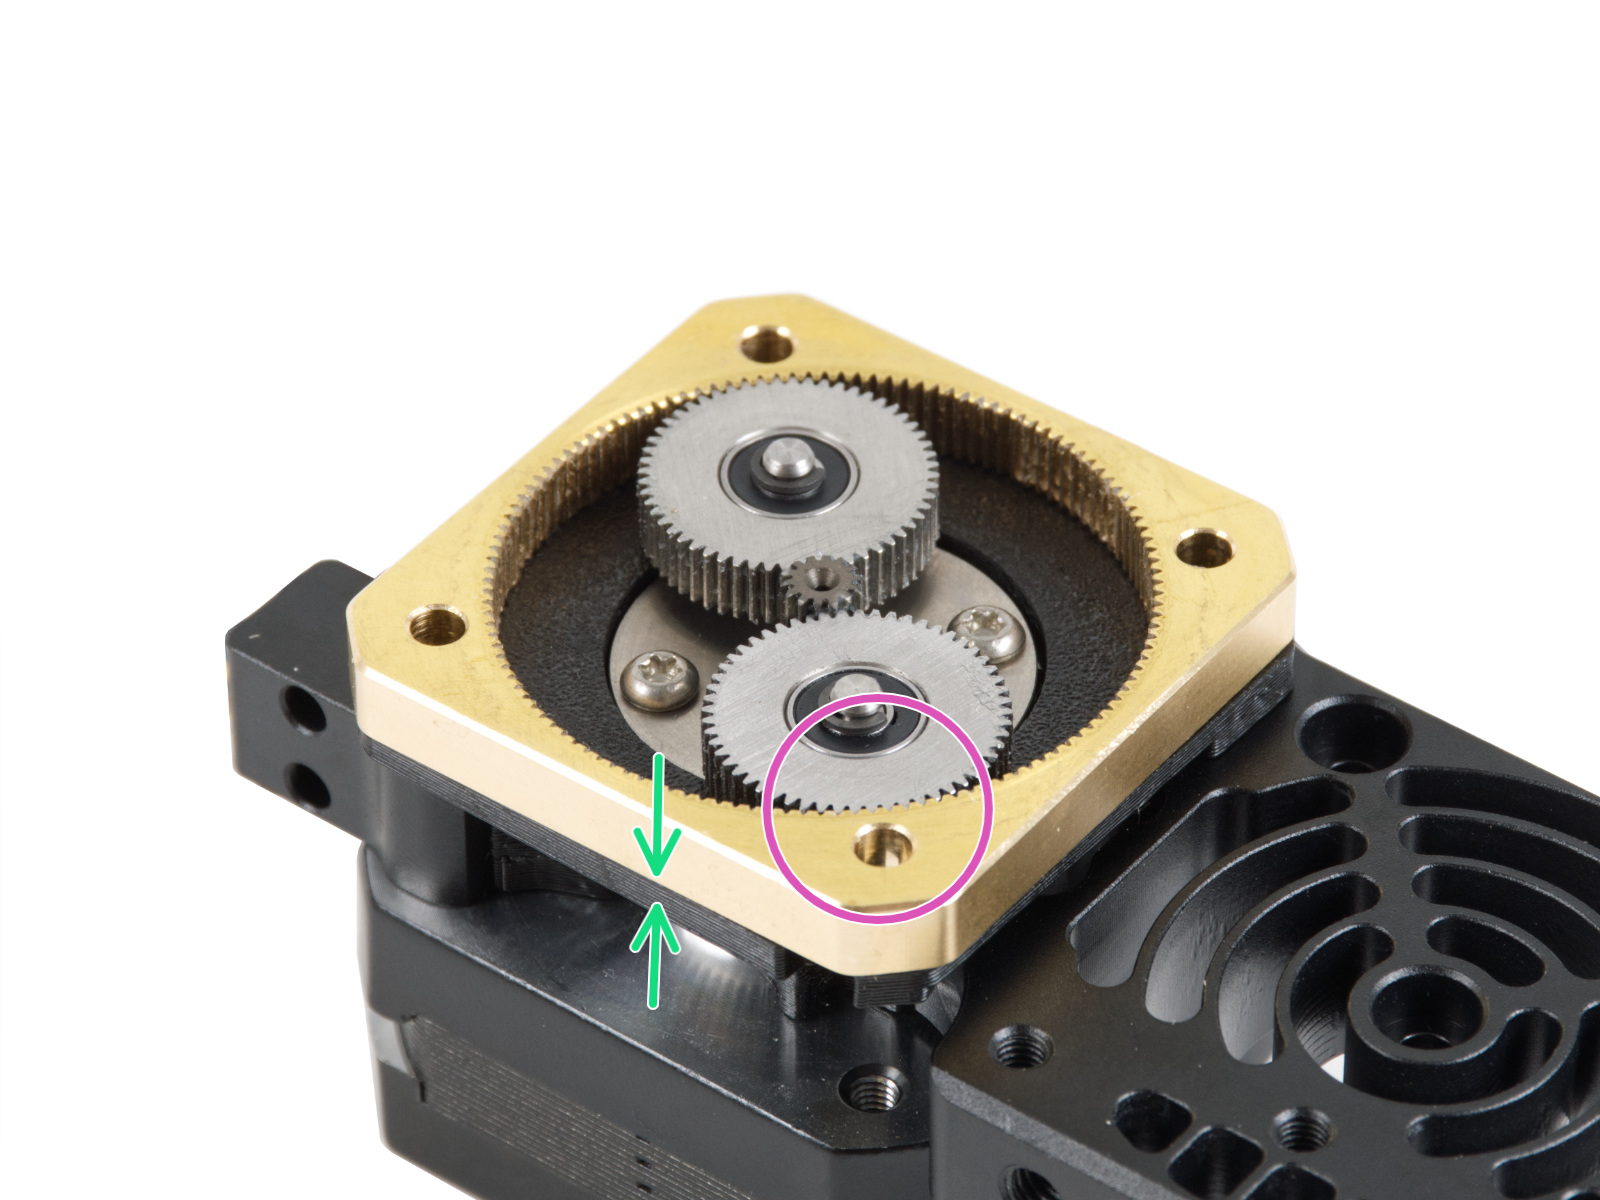
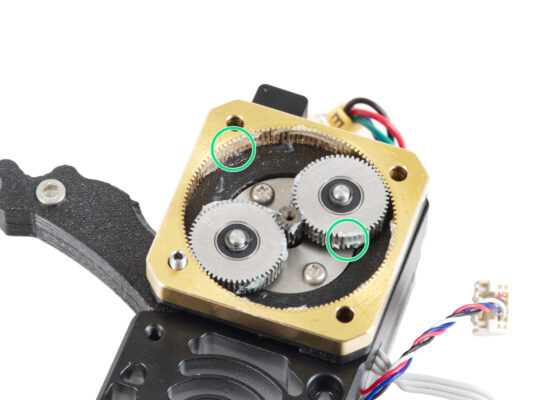
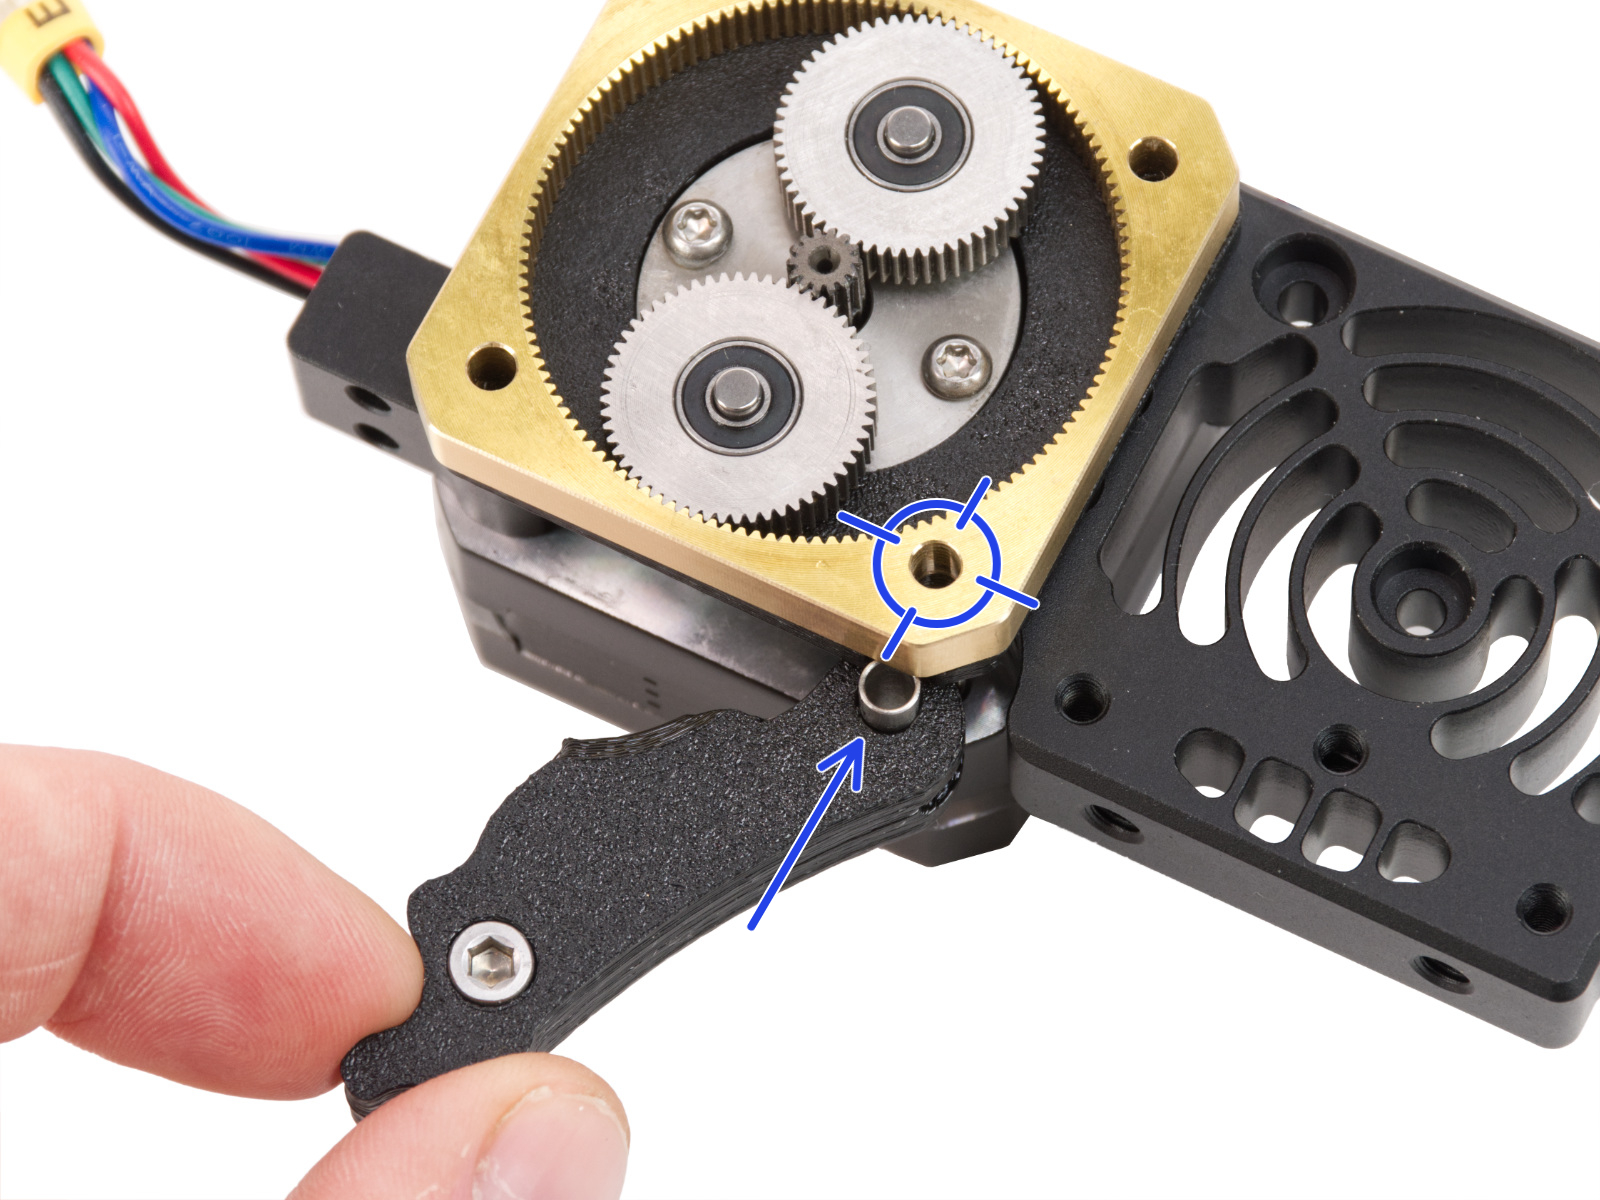
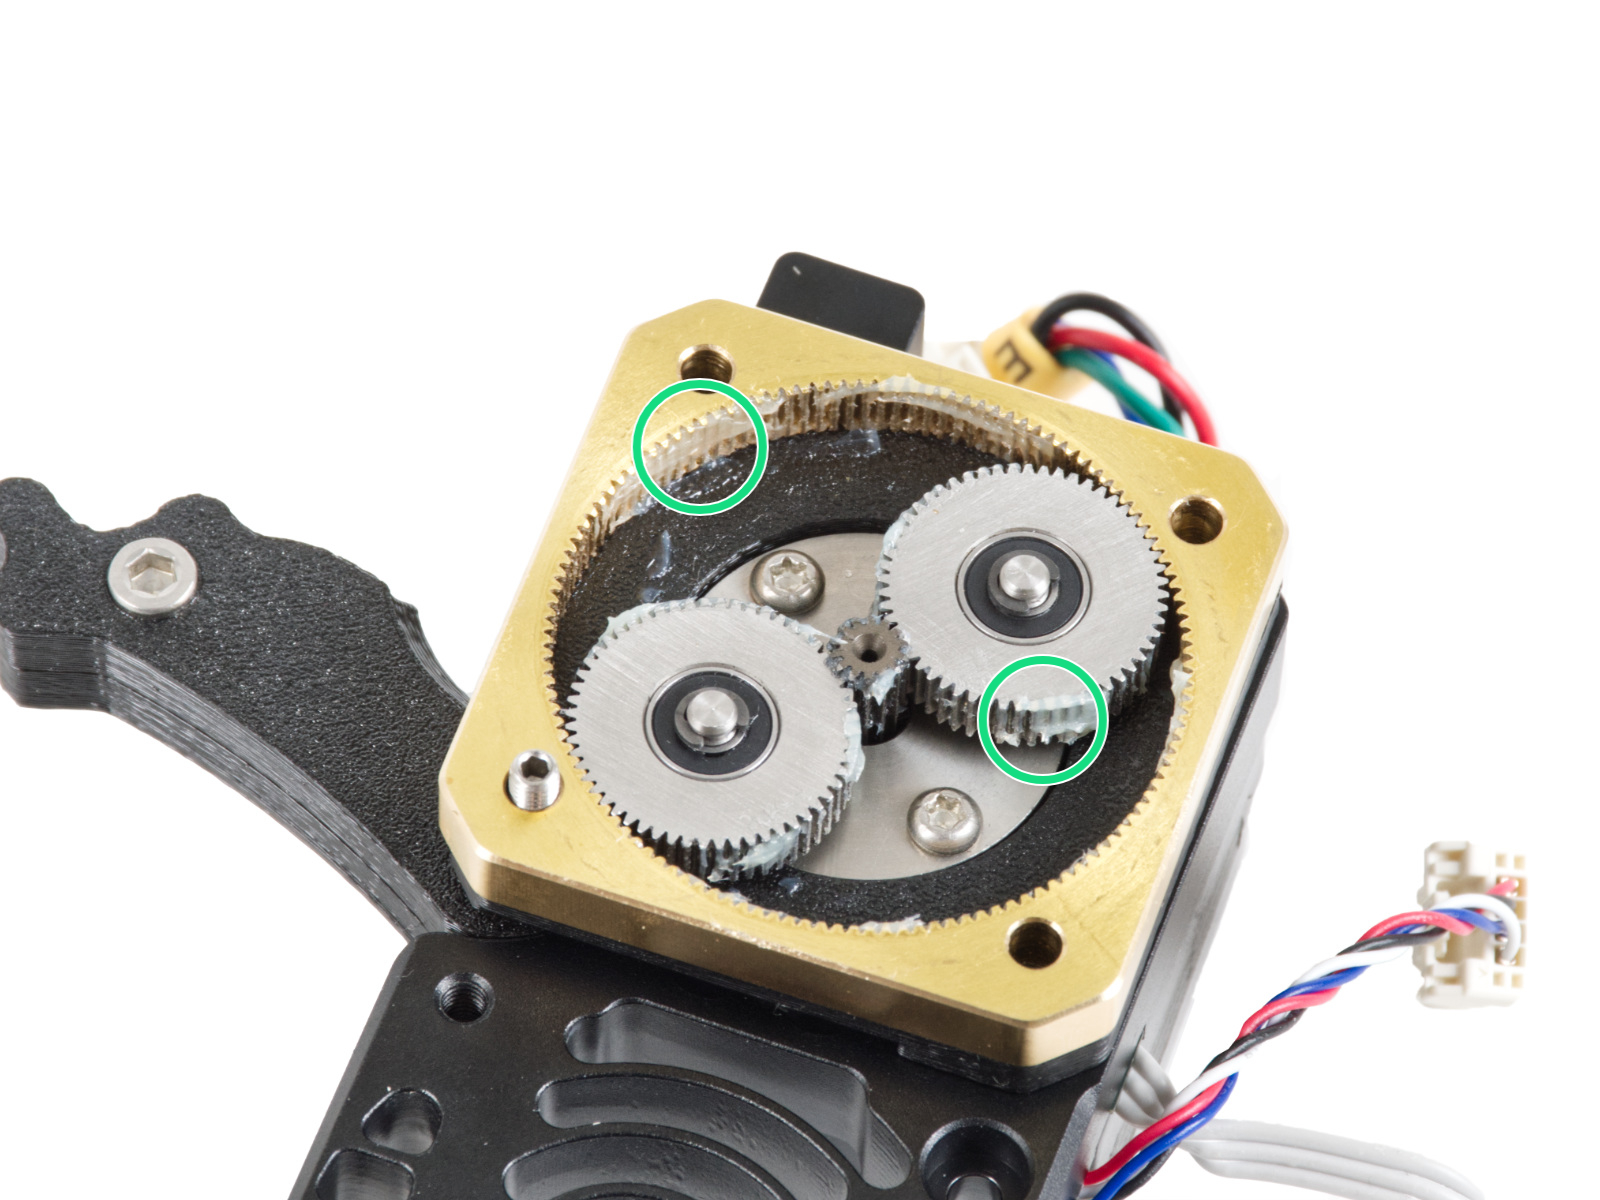
The following instructions require extreme attention. The procedure involves direct intervention in the planetary gearbox.
Preparation
Preparation
Preparation
Preparation
始める前に、プリンタのエクストルーダーがX軸とZ軸の中央にあることを確認してください。
Unload filament from the printer and remove the spool holder.
スチールシートを取り外します。
プリンタの電源を切り、電源から取り外します。
Additional parts
Additional parts
Additional parts
For this guide, please prepare:
Prusa lubricant (1x) supplied with your printer
PG-assembly-adapter (1x)
The PG-assembly-adapter might not be included in the box and might need to be printed. You can download the STL file from https://www.printables.com/model/451501-mk4mk39-printable-parts.
The STL file is located in Nextruder section. Before proceeding, please ensure to review the recommended print settings provided in the caption.
DO NOT continue without the PG-assembly-adapter. It is necessary for the assembly!
The gearbox might be greasy. We recommend preparing a paper towel for wiping off the excess grease and dirt.
Protecting the heatbed
Before you proceed, it is recommended to protect the heatbed.
フレキシブルスチールシートを外します。
十分な厚みのある布を使い、ヒートベッドを覆ってください。こうすることで、分解時に表面を傷つけることがなくなります。
Extruder removal (part 1)
エクストルーダーから上部のLoveボードカバーを引き上げて取り外します。
Remove the M3x10 screw from the right side and remove the side cover.
Remove the side cover.
Extruder removal (part 2)
There are safety latches on the front of each connector. The latch must be pushed inwards in order to be able to remove the connector. In case you can't reach the latch with your nails easily enough, use an appropriate tool to press the latch while you pull the connector out.
Disconnect the extruder motor connector.
Disconnect the Loadcell connector.
Disconnect the Filament sensor connector.
Open the fan-door.
Extruder removal (part 3)
From the other side of the extruder, disconnect the hotend heater connector. Note, the safety latch is in the front of the connector.
Disconnect the heatsink fan connector.
Disconnect both thermistor connectors. Note, the safety latch is on the left of each one.
Resease the two thumb screws holding the hotend assembly.
Release both the hotend heater and thermistor cables out of the groove inside the x-carriage.
Remove the hotend assembly by pulling it down.
Be extremely careful not to damage the cables!
Extruder removal (part 4)
Remove the two M3x18 screws holding the heatsink fan.
Remove the heatsink fan.
Remove the three M3x10 screws holding the heatsink.
Hold the extruder with your hand so that it doesn't fall off after you remove the heatsink screws!
Carefully remove the extruder assembly from the printer. Make sure not to damage any of the cables!
Extruder disassembly (part 1)
Remove the M3x4T grub screw using the short side of the T6 Torx key.
Remove the NTC heatsink thermistor. Be careful not to damage the cables.
Remove the two thumb screws on the side.
Extruder disassembly (part 2)
Remove both the M3x30 screws with the springs.
Remove the Idler-swivel assembly.
Remove the M3x25 screws.
There are several versions of the Nextruder. The earlier models feature four screws on the front, while the newer model is designed with three screws.
Remove the PG-case, the plastic cover on the front of the gearbox.
Extruder disassembly (part 3)
In case you have the "three screw" version of the Nextruder, remove the M3x25 set screw.
Remove the Idler assembly.
Remove the whole gearbox assembly: the printed main plate, the brass PG-ring and the gears.
Clean all the parts of the gearbox from excess grease and dirt.
Extruder disassembly (part 4)
Locate the metal washer that should be between the gearbox and the motor. It might be stuck to the gearbox assembly.
Earlier versions of the Nextruder use an orange spacer instead of the metal washer.
See the last picture for a reference.
Reseat the washer / spacer on the motor shaft, in case it has come off the shaft.
Remove the extruder motor from the heatsink.
Extruder disassembly (part 6)
BE EXTRA CAREFUL when removing the filament sensor. The filament sensor contains a tiny parts (spring, magnet, steel ball) that tend to fall out when the sensor is removed.
Very carefully pull the filament sensor out from the heatsink using the needle-nose pliers.
Don't lose the small parts! You will need them again later. Keep them aside in a safe place.
Installing the Hall sensor
ヒートシンクにある同じような形のポケットに、フィラメントセンサーを入れます。
M2.5x6rTネジで固定します。電子基板が割れる恐れがあるので、慎重に締めてください。
フィラメントセンサーの取り付け
フィラメントセンサーの取り付け
フィラメントセンサーの取り付け
フィラメントセンサーの取り付け
Insert the filament sensor assembly into the heatsink. Make sure the steel ball part is closer to the side of the heatsink.
Note the correct orientation of the assembly. There is a protrusion on the part. The protrusion must be facing down.
Push the assembly into the heatsink and make sure the filament sensor assembly is flush to the metal heatsink.
Assembling the extruder
ヒートシンクをエクストルーダーモーターの上に置きます。両方の部品の向きに注意してください。
モーターケーブルは「上」を向いていなければなりません。
ヒートシンクのケーブルは右側になければなりません。
メインプレートをヒートシンクに取り付けます。部品の向きに注意してください。切り込みをガイドとして使用します。
Assembling the gearbox
以下の手順は、正しく慎重に行う必要があります。ガイドと一緒にビデオを見ることで、理解を深め、組み立てを成功させましょう: prusa.io/PG-assemblyをご覧ください。
ビデオを見た後は、このガイドの手順に従ってください。
遊星ギアアセンブリアダプターを遊星ギアアセンブリに取り付けます。プリントされたアダプターのギア用ポケットに注意してください。
Assembling the PG-ring
遊星ギアアセンブリアダプターなしでギアボックスを組み立てないでください。このツールは、ギアが正しく組み合わされていることを確認するためのものです。
遊星ギアリングをアダプターにスライドさせます。
遊星ギアリングの歯の片側に面取りがあることに注意してください。この面は(アセンブリに対して)下向きでなければなりません。
遊星ギアリングと一緒に回転できるように、片手でアセンブリ全体をつかみます。
もう一方の手で、遊星ギアリングを、遊星ギアアセンブリにグリグリとスライドさせながら装着していきます(リングを左右に繰り返し動かします)-1/4回転程度で十分です。
ギアの表面が遊星ギアリングの表面とほぼ面一になったところで止めます。
Assembling the PG-assembly
このステップは慎重に進めてください。
遊星ギアアセンブリの位置を維持し、エクストルーダーモーターシャフトに取り付けます。
遊星ギアアセンブリー全体(遊星ギアアセンブリ-アダプター、遊星ギアアセンブリ、遊星ギア-リング)を、アセンブリーとメインプレートの間に隙間がなくなるまで、静かに、ゆっくりと回転させてください。アセンブリを無理に押さないでください。
Remove the PG-assembly-adapter.
Checking the PG-assembly
遊星ギアアセンブリ・アダプターを遊星ギアアセンブリに再度取り付け、すべての部品が正しく取り付けられていることを確認します。
遊星ギアアセンブリー・アダプターで回転させていきます。遊星ギアアセンブリーは、力を入れなくても簡単に回転させれるかを確認してください。
遊星ギアアダプターを取り外します。組み立て時にはもう必要ありません。メンテナンスのために保管しておくことをお勧めします。
遊星ギアアッセンブリが、遊星ギアリングよりも上に突き出ていないことを確認し、遊星ギアアッセンブリが同じ高さに収まっていることを確認します。遊星ギアリングの表面の高さより低い位置か、リングと同じ高さになるようにしてください。
Ensure that the gap between the PG-ring and the Main-plate is minimal. If a significant gap is observed, disassemble the planetary gear assembly and reposition it.
ネクストルーダーアイドラーの組み立て
ネクストルーダーアイドラーの組み立て
ネクストルーダーアイドラーの組み立て
ネクストルーダーアイドラーの組み立て
アイドラーアセンブリを、遊星ギアリングとエクストルーダーモーターの間に挿入します。メインプレートにはスペーサー用の切り欠きがあります。アイドラースペーサーを遊星ギアリングの穴に合わせます。
ソケット止めねじ3x25で両方の部品を固定します。ネジは締めすぎないようにしてください。締めた後、ネジが遊星ギアリングからはみ出します。
In case you have the 4-screw version of the Nextruder, you will install the M3x25 screw later on, instead of the set screw.
遊星ギアリングと遊星ギアアセンブリの歯の周りに少量のPrusaグリスを塗布します。
ヒント:少量の潤滑剤を結束バンドの先端に塗布し、ギアに潤滑剤を行き渡らせます。
ペーパータオルで、フロント面の余分な潤滑油を拭き取ります。
遊星ギアをカバーする
遊星ギアをカバーする
遊星ギアをカバーする
遊星ギアをカバーする
遊星ギアケースを取り、スペーサー(13x24x2.5、プラスチックリング)が既に部品に挿入されていることを確認します。
プラスチックリングの色は異なる場合があります。特性は同じです。
Cover the planetary gear and secure the PG-case with the M3x25 screws. Do not overtighten the screws!
Use three or four M3x25 screws, depending on the version of Nextruder you have.
アイドラースイベル・アセンブリの取り付け
バネ15x5をM3x30の両ネジに取り付けます。
ヒートシンクの突起にある穴に、スプリング付きのネジ2本を押し込みます。内側にネジ山はありません。
Attach the Idler-swivel assembly on the screws. See the correct orientation of the Idler-nut. The side with version marking must be visible. See the picture.
両方のネジを締めます。ネジの先端がidler nutの前面に達したら、締め付けを止めます。
Assembling the heatsink
エクストルーダーモーター側から、NTCサーミスタをヒートシンクの穴に挿入します。
M3x4rTグラブスクリューで固定します。最後までねじ込みます。指とT6トルクスキーの短い方を使って、ゆっくりとしっかりと締めます。強い力を加えると、ネジ山に損傷を与える可能性があります。
ヒートシンクに2本のサムスクリューを挿入します。まだ完全に締めないでください。今は2回転程度で十分です。
Attaching the extruder
X-carriageのスペーサーの上に、ネクストルーダーを配置します。
Make sure the heatsink thermistor cable doesn't get pinched. It should be guided through the dedicated channel in the x-carriage.
Make sure none of the cables is getting pinched behind the extruder.
ヒートシンクの穴をX-carriageのスペーサーに合わせ、3本のM3x10ネジで両パーツを締結します。中央のネジから始めます。
Ext. Cable management (part 1)
Connect the Loadcell cable into the Loveboard.
Connect the Filament sensor cable into the Loveboard.
Connect the E-motor cable into the Loveboard.
Connect the heatsink thermistor cable into the Loveboard.

Out of the two similar connectors, it goes to the connector on the right.
Carefully tuck the heatsink thermistor cable into the groove in the X-carriage.
Heatsink fan installation
Add the heatsink fan onto the extruder assembly. Make sure the cable is pointing to the left.
ホットエンドファンにはステッカーが貼られています。ステッカーはファンの裏側に貼られていなければなりません。
Attach the fan using two M3x18 screws.
Connect the heatsink fan cable to the Loveboard.

Out of the two similar connectors, the heatsink fan connects to the lower one.
Tuck the fan cable into the groove on the X-carriage too.
Hotend assembly installation
Make sure the thumb screws on the side of the heatsink are loose.
Insert the hotend assembly into the heatsink from below.

Push it all the way up.
Make sure the hotend assembly is fully inserted.
Make sure the part of the hotend with the cables is pointing to the back of the printer, as seen in the picture.
After the hotend assembly is positioned correctly, hold it in place and tighten the two thumb screws fully.
Hotend cable management
Connect the hotend thermistor cable into the Loveboard.

Hotend / nozzle thermistor connects to the left of the two similar connectors.
Tuck the cable into the groove on the X-carriage.
Connect the hotend heater cable into the Loveboard.
Finally, tuck the cable into the groove on the X-carriage.
None of the cables should be sticking out of the groove. Otherwise, the print fan won't be able to close down into the operating position and might not work properly.
Once again, verify the thumb screws are tight.
LoveBoard: Wiring check
電子機器をカバーする前に、すべてのケーブルの接続を確認します。左上の高解像度プレビューをクリックしてください。
次のステップに進む前に、アイドラー機構を閉じてください。次の順序で行ってください:
アイドラーをエクストルーダー側に閉じます。
アイドラスイベルを閉じ、エクストルーダーアイドラーアセンブリの上でロックします。
LoveBoardをカバーする: サイドカバー
写真のように、エクストルーダーの右側にケーブルをカーブさせて配置します。
LoveBoard-cover-rightでケーブルを覆います。
ケーブルを挟まないように注意してください!
Secure it with the M3x10 screw.
LoveBoard-cover-rightがエクストルーダーの右側にぴったりフィットしていることを確認してください。そうでない場合、Xキャリッジアセンブリが右に移動するのを妨げてしまうため、セルフテスト中にX軸テストが失敗する可能性があります。
LoveBoardをカバーする: 上部カバー
すべてのケーブルをエクストルーダーに押し付け、周囲にスペースを作ります。写真を参照してください。
Loveboard-cover をエクストルーダーの上にスライドさせます。そして下まで押し込んでください。カバーはX-carriage-backの裏側にある必要があります。
ケーブルを挟まないように注意してください!
2つのプラスチックカバーがぴったり合うことを確認します。
Finishing up
Finishing up
Finishing up
Remove the protective cloth off the heatbed.
Attach the steel sheet back onto the printer.
Connect the printer to the electricity and turn it on.
ウィザード - セルフテスト
ウィザード - セルフテスト

Visit the menu Control > Calibrations and tests and run all the calibrations starting with the first one.

ウィザードでは、プリンタの重要な機能をすべてテストしていきます。全てのプロセスを終了するには数分かかります。ウィザードの一部では、ユーザが直接操作する必要があります。画面の指示に従ってください。
注意:軸をテストしている間、プリンタ内に軸の動きを妨げるものがないことを確認してください。
警告:セルフテスト中は、指示がない限りプリンタに触れないでください!プリンタの一部の部品は高温になっており、また、高速で動いている可能性があります。
ウィザードは、ファンのチェック、Z軸のアライメント、X軸とY軸のテストから始まります。
ウィザード - ロードセルのテスト
ウィザード - ロードセルのテスト
ウィザード - ロードセルのテスト
ウィザード - ロードセルのテスト
ウィザードの次のステップでは、ノズルに触れてロードセルのテストとキャリブレーションを行うよう促されます。この手順では、プリンタの部品は加熱されないので、触ることはできません。Continue をクリックします。
まだノズルに触れず、Tap nozzle NOWのメッセージが表示されるまで待ちます。
ノズルを下から軽く叩きます。無理な力を加える必要はありません。ロードセルセンサーがタッチ動作を検出しない場合は、ステップを繰り返すよう促されます。成功すると、Loadcell test passed OKと表示されます。
ウィザード - ギアボックスのアライメント
Gearbox Alignment(ギアボックスアライメント)パートに移動したら、Continue(続行)を選択し、画面の指示に従います。
アイドラーロック(スイベル)を外し、アイドラードアを開けます。
ギアボックス前面の3本のネジを1.5回転緩めます。
プリンタは自動的にギアボックスのアライメント調整を行います。この工程は外からは見えません。
プロンプトが表示されたら、画面に表示されたパターンで3つのネジを締めます。
ウィザード - フィラメントセンサーのキャリブレーション
フィラメントセンサーのキャリブレーションでは、短いフィラメントを使用する必要があります。フィラメントを準備し、Continue を選択します。較正プロセスを開始する前に、エクストルーダーの内部にフィラメントがない状態にしてください。
キャリブレーションのプロセスを開始する前に、エクストルーダー内にフィラメントがない状態にしてください。
プロンプトが表示されたら、フィラメントの端をエクストルーダー上部の開口部に挿入します。
キャリブレーション終了後、フィラメントを取り外します。
Was this guide helpful?

Comments

Still have questions?

Still have questions?

If you have a question about something that isn't covered here, check out our additional resources.
And if that doesn't do the trick, you can send an inquiry to [email protected] or through the button below.

Contact us